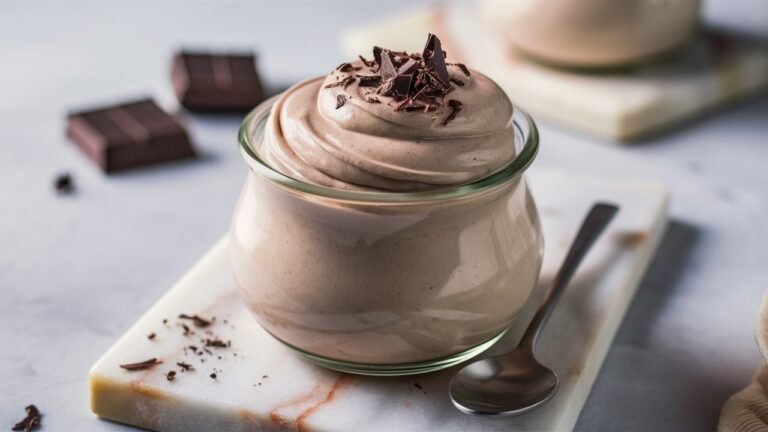
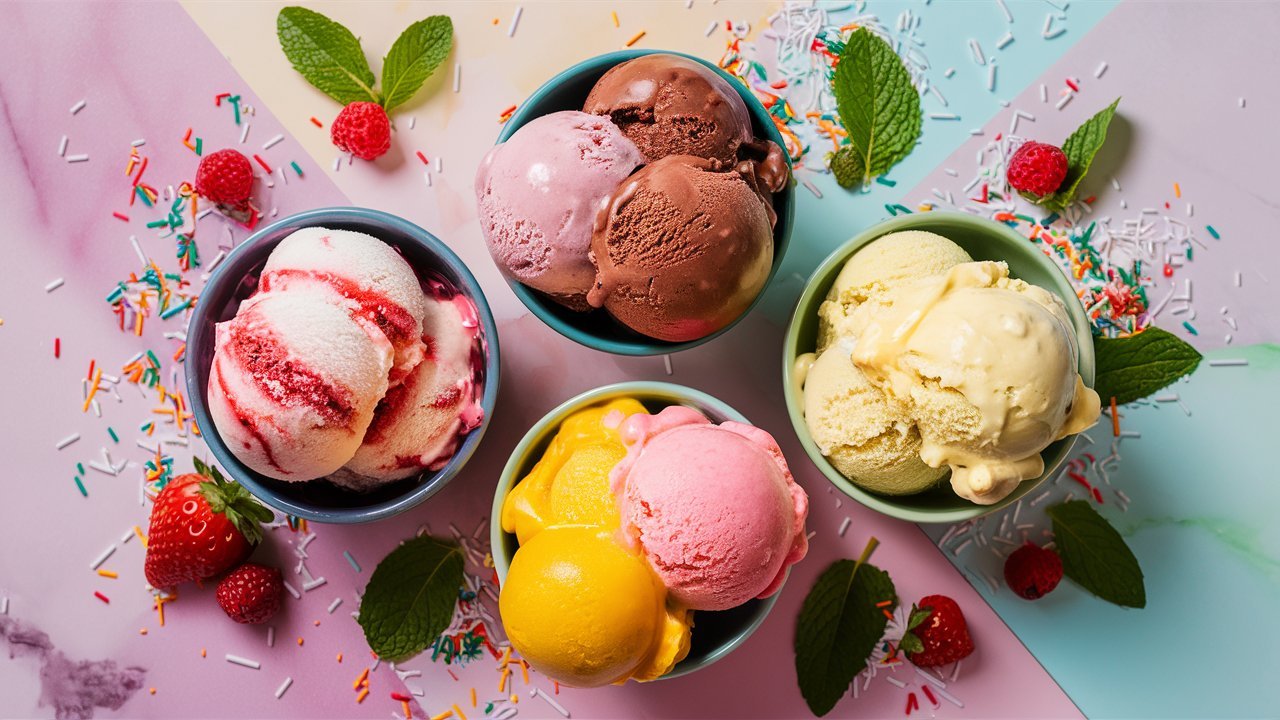
18 Delicious Homemade Ice Cream Recipes to Cool You Down
Ever caught yourself staring longingly at those fancy ice cream shop flavors and thinking, “I wish I could make that at home”? Well, guess what? You absolutely can! 😉 As someone who’s spent way too many summer afternoons experimenting with my ice cream maker, I’m here to share my all-time favorite homemade frozen creations that’ll have you ditching store-bought forever.
Making your own ice cream isn’t just ridiculously fun – it lets you control exactly what goes into your dessert. No weird preservatives or unpronounceable ingredients, just pure frozen bliss that you crafted with your own hands. Plus, you get major bragging rights when friends ask where you bought that amazing maple bourbon pecan ice cream. “Oh this? I made it myself!” 💁♀️
Why Homemade Ice Cream Will Change Your Life 🙌
Let’s be real here – have you ever tasted fresh ice cream that’s just been churned? That creamy, soft-serve-like texture that’s somehow both light and rich at the same time? It’s a complete game-changer. Commercial ice creams pump in air (called overrun) to increase volume and profits, but your homemade version will have that dense, premium mouthfeel that makes artisanal ice creams cost $12 a pint.
I got into making ice cream after receiving an ice cream maker for my birthday three years ago, and it’s become something of an obsession. My friends now expect me to show up at every summer gathering with a container of my latest creation. Not that I’m complaining – being the “ice cream person” is a title I wear proudly!
Equipment Options: From Simple to Fancy 🛠️
Before diving into recipes, let’s talk about how to actually make this happen in your kitchen:
- Traditional ice cream maker – My personal favorite. These machines have a freezable bowl that you pre-chill, then they churn your mixture while it freezes.
- Compressor ice cream makers – The fancy option! These have built-in freezers so no pre-freezing required. Just pour in your mixture and go.
- No-churn methods – Yes, you can make ice cream without any special equipment! These recipes typically use whipped cream and condensed milk.
- Ball ice cream makers – Fun for kids! These are balls you fill with ingredients, then roll around (great for camping trips).
- Stand mixer attachment – If you already have a KitchenAid, you can buy a freezable bowl attachment.
Don’t worry if you don’t have fancy equipment – I’ve included options for everyone, including no-churn recipes that require zero special tools. Ice cream democracy for all! 🗽
Lemon Basil Sorbet
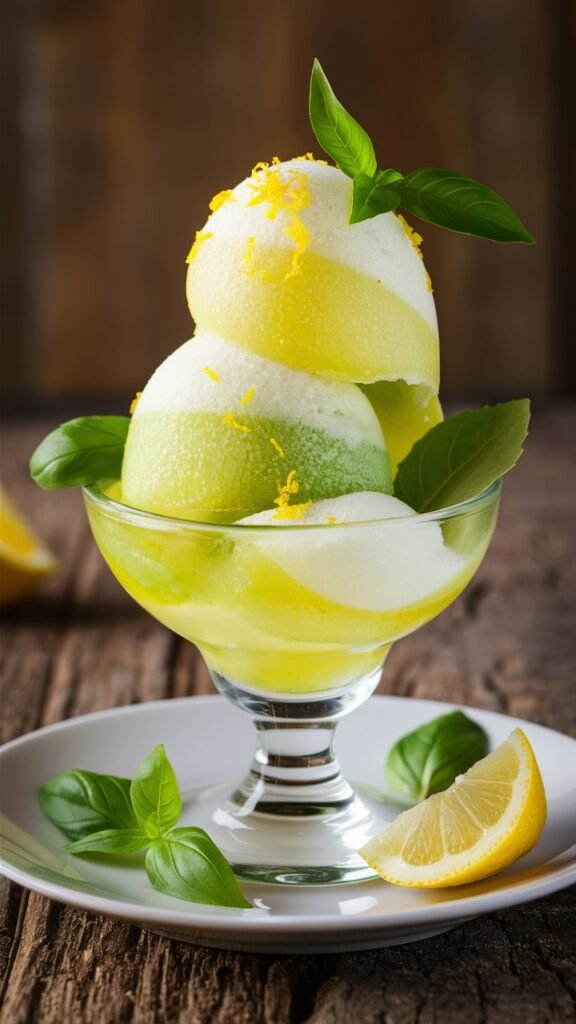
Lemon Basil Sorbet is a refreshing treat that perfectly balances citrusy brightness with the subtle earthy notes of basil. This vibrant sorbet is not only simple to make but also offers a delightful twist on traditional frozen desserts, making it a unique addition to your summer menu.
The combination of tart lemon juice and aromatic basil creates a flavor profile that’s both invigorating and soothing. Whether enjoyed on a hot day or served as a palate cleanser between courses, this sorbet is sure to impress with its zesty kick and herbaceous undertones.
Ingredients
- 2 cups fresh basil leaves
- 1 cup water
- 1 cup granulated sugar
- 1 cup fresh lemon juice
- 1 tablespoon lemon zest
- Pinch of salt
Instructions
- Make the Basil Infusion: In a saucepan, combine water and sugar over medium heat. Stir until the sugar dissolves. Add the basil leaves and let it simmer for about 10 minutes, then remove from heat and let it steep for another 10 minutes.
- Strain the Mixture: Strain the basil infusion through a fine-mesh sieve into a mixing bowl, discarding the basil leaves. Add the fresh lemon juice, lemon zest, and a pinch of salt. Stir well.
- Chill: Place the mixture in the refrigerator for at least 1 hour until thoroughly chilled.
- Churn: Pour the chilled mixture into an ice cream maker and churn according to the manufacturer’s instructions until it reaches a soft-serve consistency.
- Freeze: Transfer the sorbet to an airtight container and freeze for at least 4 hours or until firm.
- Serve: Scoop the sorbet into bowls and enjoy this refreshing treat!
Vanilla Bean Dream
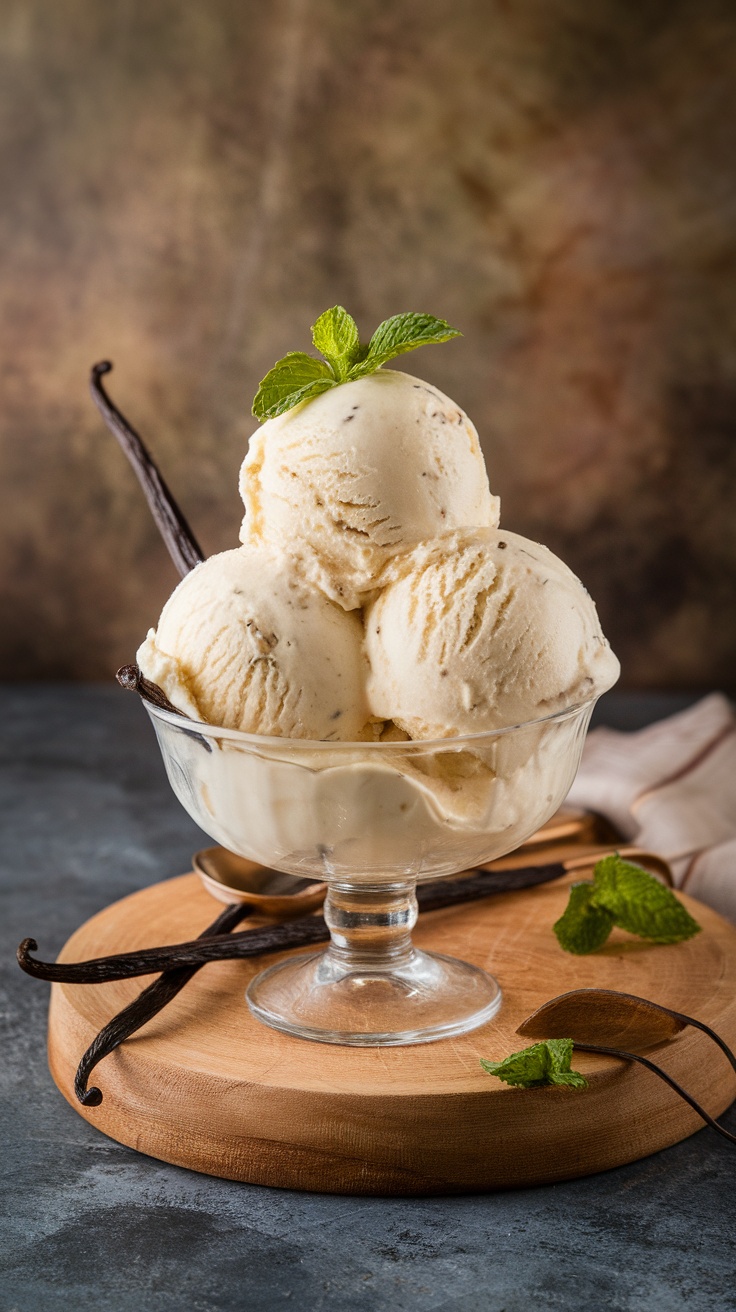
Indulge in this delightful Vanilla Bean Dream ice cream recipe, which captures the classic and comforting flavor of vanilla in every creamy scoop. Made with real vanilla beans, this homemade treat is both simple to prepare and a joyful way to cool off during warm days.
The rich, velvety texture combined with the specks of vanilla bean creates a taste that’s both nostalgic and refreshing. Perfect for serving on its own or as a topping for your favorite desserts, this recipe is sure to become a staple in your kitchen.
Ingredients
- 2 cups heavy cream
- 1 cup whole milk
- 3/4 cup granulated sugar
- 1 tablespoon pure vanilla extract
- 1 vanilla bean, split and scraped
- 1/4 teaspoon salt
- 4 large egg yolks
Instructions
- Heat the Cream: In a saucepan, combine the heavy cream, whole milk, sugar, and salt over medium heat. Stir until the sugar dissolves and the mixture is warm but not boiling.
- Add Vanilla: Remove the saucepan from heat. Stir in the vanilla extract and the scraped seeds from the vanilla bean. Let it cool slightly.
- Whisk Egg Yolks: In a separate bowl, whisk the egg yolks until they become pale. Gradually add the warm cream mixture to the yolks, whisking continuously to prevent curdling.
- Thicken the Mixture: Return the entire mixture to the saucepan and cook over low heat, stirring constantly, until it thickens enough to coat the back of a spoon. Do not let it boil.
- Chill: Remove from heat and strain the mixture through a fine mesh sieve into a bowl. Cover and refrigerate until completely chilled, preferably overnight.
- Churn: Once chilled, pour the mixture into an ice cream maker and churn according to the manufacturer’s instructions until it reaches a soft-serve consistency.
- Freeze: Transfer the ice cream to a lidded container and freeze for at least 4 hours to firm up before serving.
Coffee Espresso Explosion
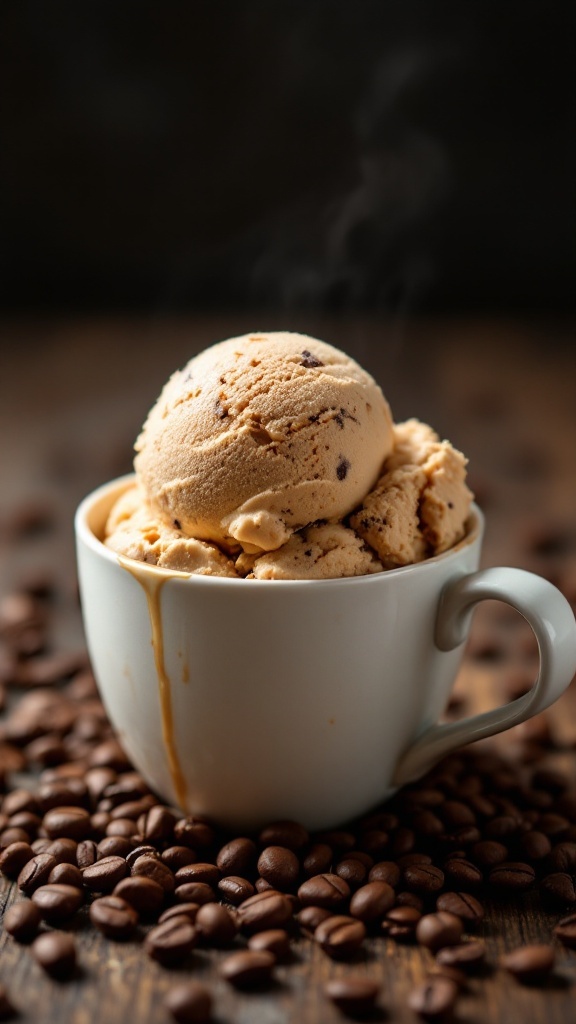
If you’re a coffee lover, this Coffee Espresso Explosion ice cream is a delightful treat that brings your favorite brew right into dessert form. With its rich espresso flavor and creamy texture, every scoop is a delightful blend of sweetness and that satisfying coffee kick.
This recipe is easy to follow, making it a perfect choice for a weekend project or a simple weeknight dessert. You’ll love the luscious taste that combines the creaminess of ice cream with the boldness of espresso, making it ideal for warm days or any time you need a pick-me-up!
Ingredients
- 2 cups heavy cream
- 1 cup whole milk
- 3/4 cup granulated sugar
- 1 tablespoon vanilla extract
- 1/2 cup brewed espresso, cooled
- 1/4 cup coffee liqueur (optional)
- 1/2 cup chocolate chips (optional, for extra indulgence)
Instructions
- Mix the Base: In a large mixing bowl, whisk together the heavy cream, whole milk, sugar, vanilla extract, and cooled espresso until the sugar is dissolved and everything is well combined.
- Add Liqueur: If you’re using coffee liqueur, stir it into the mixture at this stage for an extra layer of flavor.
- Chill: Cover the mixture and refrigerate for about 2 hours or until thoroughly chilled.
- Churn: Pour the chilled mixture into an ice cream maker and churn according to the manufacturer’s instructions until it reaches a soft-serve consistency.
- Mix in Chocolate: If desired, fold in chocolate chips for a little extra sweetness and texture.
- Freeze: Transfer the ice cream to a lidded container and freeze for at least 4 hours to firm up.
- Serve: Scoop and enjoy your homemade Coffee Espresso Explosion ice cream!
Mint Chocolate Chip Refreshment
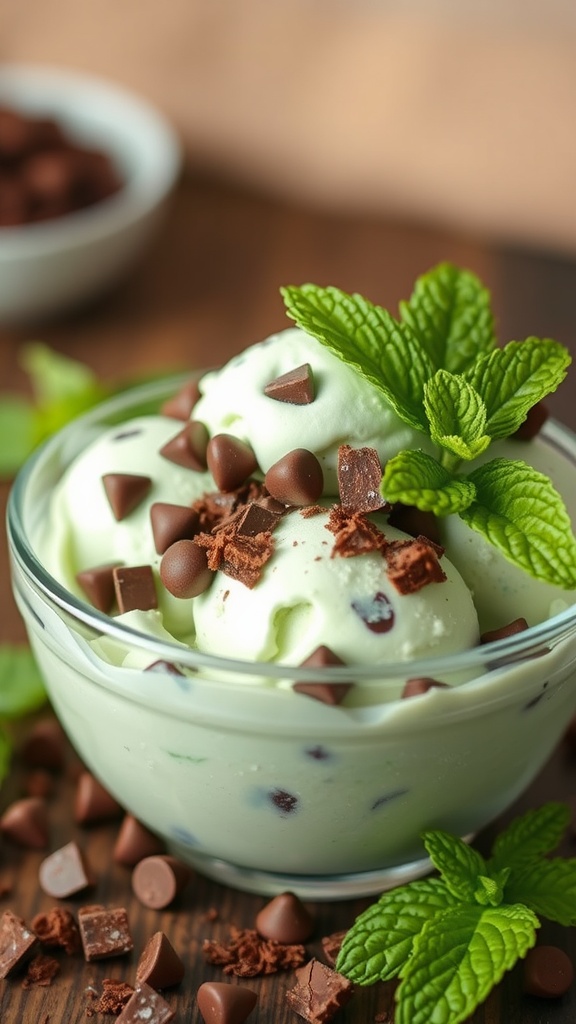
Mint chocolate chip ice cream is a delightful treat that combines the coolness of mint with the richness of chocolate. This refreshing dessert is not only a crowd-pleaser but also surprisingly simple to make at home. With its vibrant green color and delightful texture, it’s perfect for warm days or anytime you’re craving something sweet.
The combination of creamy ice cream, fresh mint flavor, and crunchy chocolate chips creates a satisfying contrast that makes every scoop enjoyable. Plus, making it from scratch means you can adjust the mintiness and sweetness to your liking, ensuring a personalized treat.
Ingredients
- 2 cups heavy cream
- 1 cup whole milk
- 3/4 cup granulated sugar
- 1 teaspoon pure vanilla extract
- 1 teaspoon peppermint extract
- 1/2 cup chocolate chips
- 1/2 cup chopped mint leaves
- Green food coloring (optional)
Instructions
- In a medium bowl, whisk together the heavy cream, whole milk, granulated sugar, vanilla extract, and peppermint extract until the sugar is dissolved.
- Add the chopped mint leaves to the mixture and let it steep for about 30 minutes for the flavors to infuse.
- After steeping, strain the mixture to remove the mint leaves and stir in chocolate chips. If desired, add a few drops of green food coloring to achieve your preferred shade.
- Pour the mixture into an ice cream maker and churn according to the manufacturer’s instructions until it reaches a soft-serve consistency.
- Transfer the churned ice cream into a lidded container and freeze for at least 4 hours until firm.
- Scoop and serve, garnished with additional chocolate chips or mint leaves if desired.
Peanut Butter Cup Creation
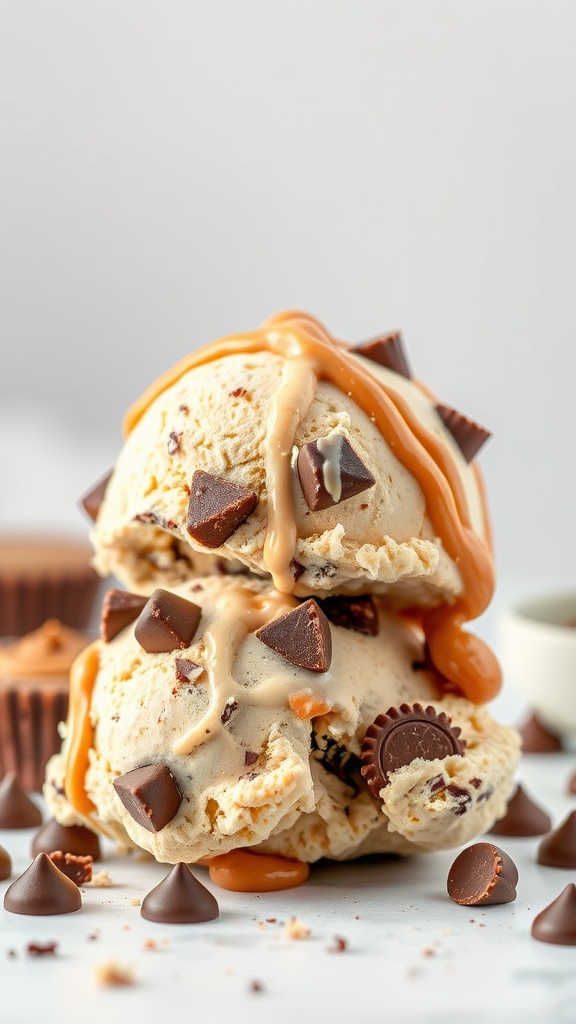
Indulging in a homemade peanut butter cup ice cream is like treating yourself to a scoop of joy! This recipe offers a delightful blend of creamy peanut butter and rich chocolate, making each bite a satisfying experience. It’s surprisingly simple to whip up, perfect for a warm day or as a sweet ending to any meal.
With minimal ingredients and easy steps, you can create a dessert that feels indulgent without needing to spend hours in the kitchen. This recipe uses peanut butter cups mixed into a velvety ice cream base that’s sure to please everyone in the family!
Ingredients
- 2 cups heavy cream
- 1 cup whole milk
- 3/4 cup granulated sugar
- 1 teaspoon vanilla extract
- 1 cup creamy peanut butter
- 1/2 cup chopped peanut butter cups
- 1/4 cup chocolate syrup (for drizzling)
Instructions
- Make the Base: In a large bowl, whisk together the heavy cream, whole milk, sugar, vanilla extract, and creamy peanut butter until well-combined.
- Chill the Mixture: Cover the bowl and place it in the refrigerator for at least 1 hour to chill.
- Churn the Ice Cream: Pour the chilled mixture into an ice cream maker and churn according to the manufacturer’s instructions until it reaches a soft-serve consistency.
- Add Mix-Ins: In the last few minutes of churning, add the chopped peanut butter cups to the ice cream maker and mix until evenly distributed.
- Freeze: Transfer the ice cream to an airtight container and freeze for at least 4 hours or until firm. Serve with a drizzle of chocolate syrup on top!
Salted Caramel Delight
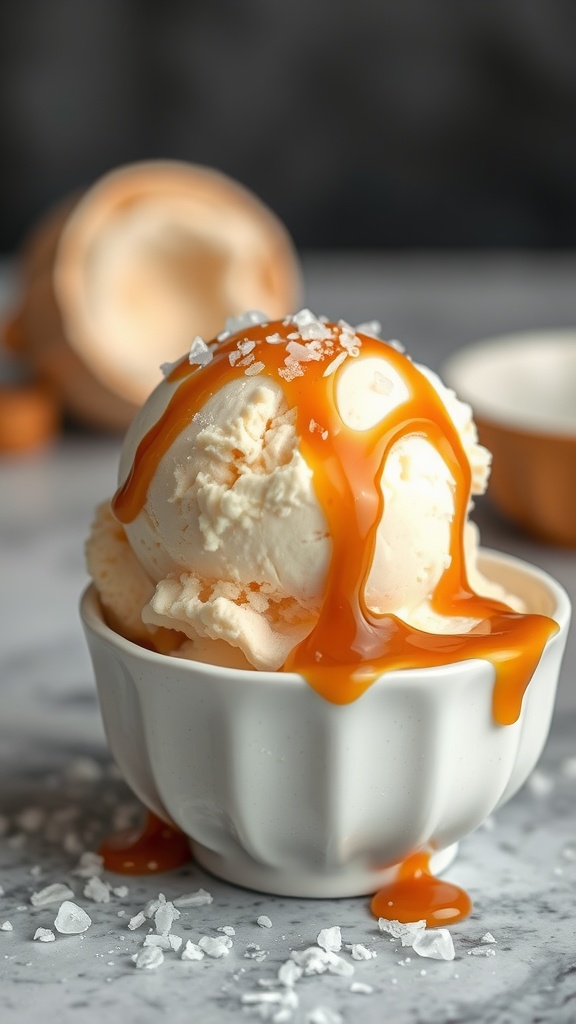
Salted Caramel Delight is a creamy and indulgent ice cream that strikes a beautiful balance between sweet and salty. The rich caramel flavor is enhanced with a hint of sea salt, making each bite a delightful experience. This recipe is straightforward, perfect for both novice cooks and seasoned chefs looking to impress.
When the warm days of summer call for a refreshing treat, this homemade ice cream will surely be a hit. You can whip it up easily, and the combination of silky ice cream with luscious caramel sauce is simply irresistible.
Ingredients
- 2 cups heavy cream
- 1 cup whole milk
- 3/4 cup granulated sugar
- 1 teaspoon pure vanilla extract
- 1/2 cup salted caramel sauce (store-bought or homemade)
- 1/2 teaspoon sea salt
Instructions
- In a large bowl, whisk together heavy cream, whole milk, sugar, and vanilla extract until the sugar dissolves completely.
- Stir in the salted caramel sauce until well combined. Taste the mixture and adjust the salt if needed.
- Pour the mixture into an ice cream maker and churn according to the manufacturer’s instructions, usually around 20-25 minutes.
- Transfer the soft ice cream to an airtight container and freeze for at least 4 hours or until firm.
- Before serving, drizzle extra salted caramel sauce on top for an extra treat!
Chocolate Hazelnut Indulgence
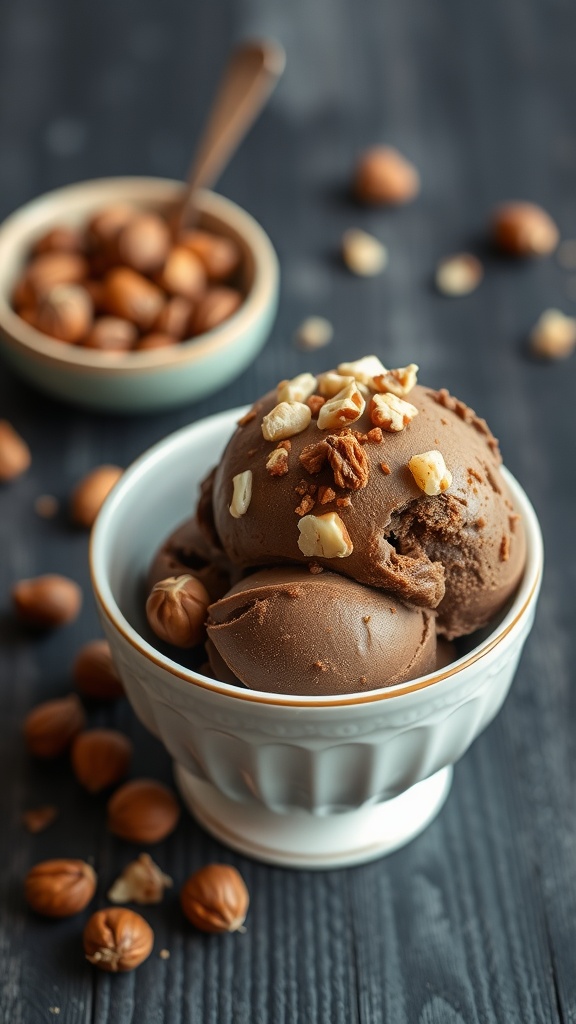
If you’re a chocolate lover, this Chocolate Hazelnut ice cream is a delightful treat you won’t want to miss. Creamy, rich, and packed with the nutty flavor of hazelnuts, this ice cream is easy to make and is sure to satisfy your sweet tooth. The combination of chocolate and hazelnut creates a velvety texture and a taste that reminds you of popular spreads but in a frozen form.
This recipe is straightforward, requiring just a few ingredients and minimal effort. Perfect for a hot summer day or any time you crave a sweet dessert, making this indulgent ice cream at home will impress your family and friends.
Ingredients
- 2 cups heavy cream
- 1 cup whole milk
- 3/4 cup granulated sugar
- 1 teaspoon vanilla extract
- 1/2 cup chocolate hazelnut spread
- 1/4 cup chopped hazelnuts (optional)
Instructions
- In a medium bowl, whisk together the heavy cream, whole milk, sugar, and vanilla extract until the sugar is dissolved.
- Add the chocolate hazelnut spread to the mixture and whisk until fully incorporated.
- Pour the mixture into an ice cream maker and churn according to the manufacturer’s instructions, usually around 20-25 minutes.
- In the last few minutes of churning, add the chopped hazelnuts if using.
- Transfer the ice cream to an airtight container and freeze for at least 4 hours or until firm. Serve and enjoy!
Fresh Strawberry Bliss
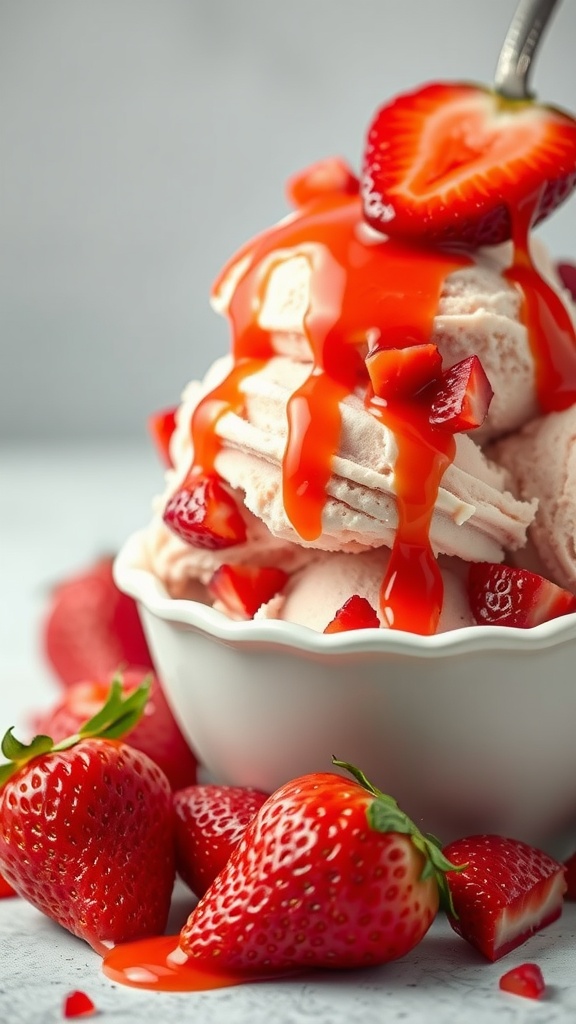
Fresh Strawberry Bliss is a delightful treat that combines the natural sweetness of ripe strawberries with the creamy goodness of homemade ice cream. This recipe is simple to make and perfect for warm summer days or any time you crave a fruity dessert. Just imagine the fresh strawberry flavor melting in your mouth!
This ice cream is not just about taste; it’s also a fun project to do with family or friends. With just a few ingredients, you can whip up a batch that’s sure to impress. Grab some strawberries and let’s get started!
Ingredients
- 2 cups fresh strawberries, hulled and sliced
- 1 cup granulated sugar
- 1 cup heavy cream
- 1 cup whole milk
- 1 teaspoon vanilla extract
- 1 tablespoon lemon juice
Instructions
- Prepare the Strawberries: In a bowl, mix sliced strawberries with 1/4 cup of sugar. Let them sit for about 30 minutes to release their juices.
- Blend the Mixture: In a blender, combine the macerated strawberries with the remaining sugar, heavy cream, milk, vanilla extract, and lemon juice. Blend until smooth but leave some chunks for texture.
- Chill: Pour the mixture into a container and refrigerate for at least 2 hours or until well chilled.
- Churn: Transfer the chilled mixture to an ice cream maker and churn according to the manufacturer’s instructions, typically around 20-25 minutes.
- Freeze: Once churned, transfer the ice cream to a lidded container and freeze for at least 4 hours to firm up.
Coconut Cream Paradise
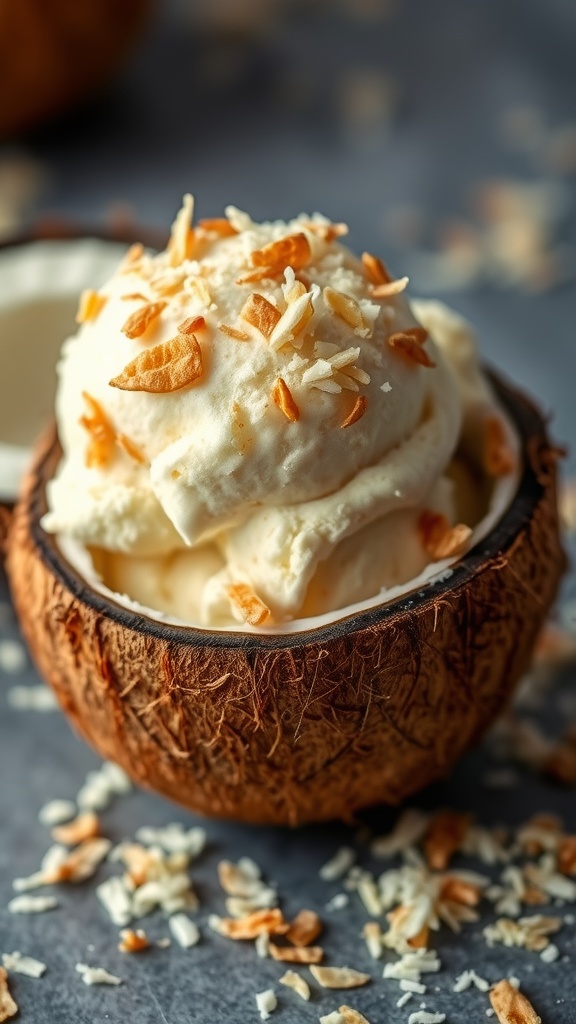
Imagine a scoop of creamy, dreamy coconut ice cream that transports you straight to a tropical getaway. This Coconut Cream Paradise recipe is all about rich, coconut flavor combined with a velvety texture that makes every bite feel indulgent yet refreshing. It’s surprisingly simple to make, requiring just a handful of ingredients and minimal effort.
Perfect for summer days or any time you crave a sweet escape, this treat will delight coconut lovers and ice cream fans alike. With its gentle sweetness and hint of toasted coconut, it’s sure to become a favorite in your homemade ice cream repertoire.
Ingredients
- 2 cups coconut cream
- 1 cup sweetened condensed milk
- 1 cup whole milk
- 1 teaspoon vanilla extract
- 1/2 cup shredded coconut (toasted)
Instructions
- Prepare the Mixture: In a large mixing bowl, combine coconut cream, sweetened condensed milk, whole milk, and vanilla extract. Stir until well combined.
- Add Coconut: Gently fold in the toasted shredded coconut, ensuring it’s evenly distributed throughout the mixture.
- Chill the Mixture: Cover the bowl and place it in the refrigerator for at least 2 hours, or until it is thoroughly chilled.
- Churn: Pour the chilled mixture into an ice cream maker and churn according to the manufacturer’s instructions until it reaches a soft-serve consistency.
- Freeze: Transfer the ice cream to an airtight container and freeze for at least 4 hours to firm up. Serve and enjoy!
Cookies and Cream Crunch

Cookies and Cream Crunch is a delightful blend of creamy vanilla ice cream and crunchy cookie bits that make every scoop a treat. The combination of sweet creaminess paired with the rich, chocolatey flavor of cookies creates a satisfying and nostalgic dessert that everyone loves. Plus, it’s easy to whip up, making it a go-to recipe for ice cream lovers.
This recipe is not only simple but also allows you to customize it with your favorite cookies. Whether you’re using classic chocolate sandwich cookies or a mix of different varieties, the result will always be a crowd-pleaser. Grab your ice cream maker, and let’s get started on this fun and tasty treat!
Ingredients
- 2 cups heavy cream
- 1 cup whole milk
- 3/4 cup granulated sugar
- 1 teaspoon vanilla extract
- 1 cup crushed chocolate sandwich cookies
- 1/2 cup mini chocolate chips
Instructions
- Mix the Base: In a large bowl, whisk together the heavy cream, whole milk, sugar, and vanilla extract until the sugar is dissolved.
- Chill the Mixture: Cover the bowl and refrigerate the mixture for at least 2 hours, or overnight for the best flavor.
- Prepare the Ice Cream Maker: Pour the chilled mixture into your ice cream maker and churn according to the manufacturer’s instructions until it reaches a soft-serve consistency.
- Add the Crunch: During the last few minutes of churning, slowly add the crushed cookies and mini chocolate chips to the ice cream.
- Freeze: Transfer the ice cream to an airtight container and freeze for at least 4 hours or until firm.
- Serve: Scoop into bowls and enjoy your homemade Cookies and Cream Crunch!
Matcha Green Tea Fusion
Matcha green tea fusion is a delightful homemade ice cream that combines the earthy flavors of matcha with a creamy texture. This recipe is not only refreshing but also simple to whip up, making it a perfect treat for any occasion. The subtle bitterness of matcha pairs beautifully with the sweetness of the ice cream, creating a unique dessert that’s both indulgent and satisfying.
Whether you’re a matcha lover or just curious to try something new, this recipe is a breeze to make and will surely impress your friends and family. Plus, it’s a fun way to incorporate the health benefits of matcha into your dessert. Let’s dive into the ingredients and instructions for this amazing treat!
Ingredients
- 2 cups heavy cream
- 1 cup whole milk
- 3/4 cup granulated sugar
- 2 tablespoons matcha green tea powder
- 1 teaspoon vanilla extract
- A pinch of salt
Instructions
- Mix the Ingredients: In a bowl, whisk together the heavy cream, whole milk, sugar, matcha powder, vanilla extract, and salt until well combined and the sugar is dissolved.
- Chill the Mixture: Cover the bowl and refrigerate the mixture for at least 2 hours, or until it’s nice and cold.
- Churn the Ice Cream: Pour the chilled mixture into an ice cream maker and churn according to the manufacturer’s instructions until it reaches a soft-serve consistency.
- Freeze: Transfer the ice cream to an airtight container and freeze for at least 4 hours to firm up before serving.
- Serve: Scoop the ice cream into bowls and enjoy your homemade matcha green tea fusion!
Mango Tango Bliss
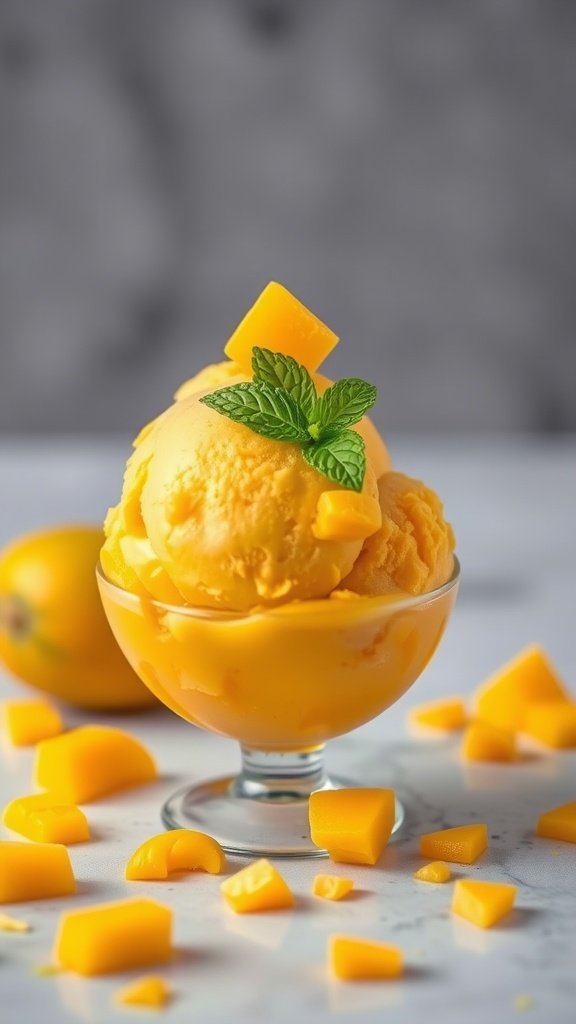
If you’re craving a tropical escape, Mango Tango Bliss is the ice cream recipe to try! This delightful treat captures the sweet and tangy flavors of ripe mangoes, making each bite a refreshing experience. It’s simple to whip up, requiring just a few ingredients, and it’s perfect for both warm days and special occasions.
Not only is this mango ice cream incredibly delicious, but it also brings a burst of sunshine to your dessert table. You’ll love how creamy and smooth it turns out, with the natural sweetness of mangoes shining through. Whether you serve it in a cone, a cup, or straight from the tub, it’s sure to be a hit!
Ingredients
- 3 ripe mangoes, peeled and chopped
- 1 cup coconut milk
- 1/2 cup heavy cream
- 1/4 cup honey or maple syrup
- 1 teaspoon vanilla extract
Instructions
- Blend the Ingredients: In a blender, combine the chopped mangoes, coconut milk, heavy cream, honey (or maple syrup), and vanilla extract. Blend until smooth and creamy.
- Taste and Adjust: Taste the mixture and adjust sweetness if needed by adding more honey or syrup.
- Chill the Mixture: Pour the mixture into a bowl and refrigerate for about 1 hour to chill.
- Churn: Pour the chilled mango mixture into an ice cream maker and churn according to the manufacturer’s instructions until it reaches a soft-serve consistency.
- Freeze: Transfer the ice cream to an airtight container and freeze for at least 4 hours, or until firm.
- Serve: Scoop and enjoy your homemade Mango Tango Bliss on a hot day!
Raspberry Ripple Treat
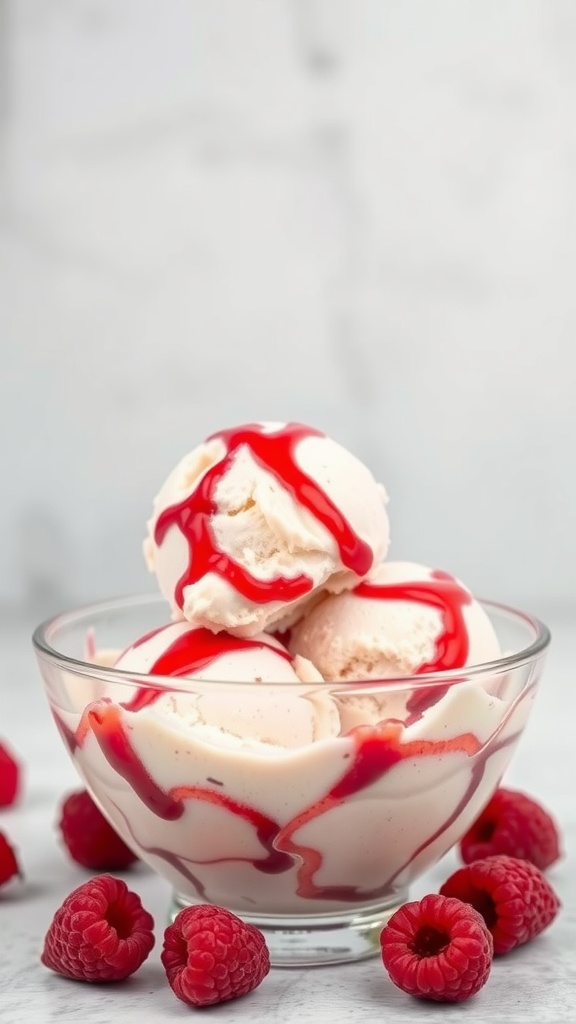
If you’re looking for a refreshing dessert that perfectly balances creamy and fruity flavors, this Raspberry Ripple Treat is just the thing. With its delightful raspberry swirls and smooth ice cream base, every spoonful is a treat for your taste buds. Plus, it’s simple enough to whip up at home, making it a great choice for warm days or special occasions.
This recipe combines the sweetness of vanilla ice cream with the tangy zip of fresh raspberries, creating a beautiful marbled effect that’s as pleasing to the eye as it is to the palate. Whether you’re serving it at a summer gathering or enjoying it on a quiet evening, this dessert is sure to satisfy your sweet cravings.
Ingredients
- 2 cups heavy cream
- 1 cup sweetened condensed milk
- 1 teaspoon vanilla extract
- 1 cup fresh raspberries
- 1/4 cup sugar
- 1 tablespoon lemon juice
Instructions
- Make the Ice Cream Base: In a large bowl, whip the heavy cream until soft peaks form. Gently fold in the sweetened condensed milk and vanilla extract until well combined.
- Prepare the Raspberry Sauce: In a small saucepan, combine the fresh raspberries, sugar, and lemon juice. Cook over medium heat for about 5 minutes, stirring occasionally until the raspberries break down into a sauce. Remove from heat and let cool.
- Combine: In a freezer-safe container, layer half of the ice cream base, followed by half of the raspberry sauce. Repeat the layers, using a knife to gently swirl the raspberry sauce into the ice cream.
- Freeze: Cover and freeze for at least 4 hours, or until the ice cream is firm.
- Serve: Scoop the raspberry ripple ice cream into bowls and enjoy your delicious treat!
Cherry Almond Surprise
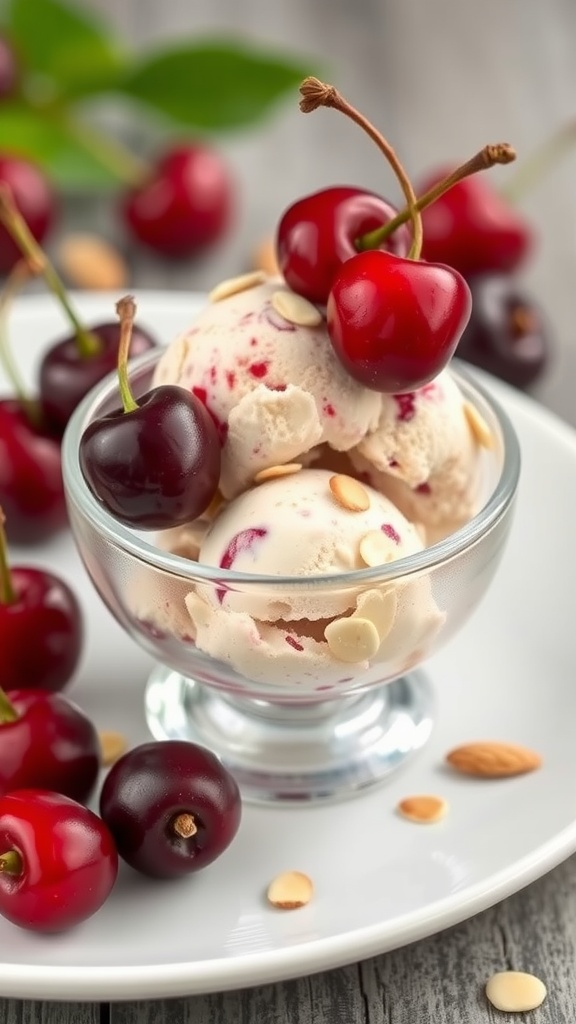
Cherry Almond Surprise is a delightful treat that combines the sweet and slightly tart flavor of cherries with the nutty essence of almonds. This creamy ice cream is not only delicious but also easy to make, making it a go-to recipe for hot summer days or anytime you crave something refreshing. The beautiful blend of flavors ensures that each scoop is a little surprise of cherry goodness and almond crunch.
Whether you’re hosting a gathering or just treating yourself, this recipe is sure to impress. Plus, it’s simple enough for anyone to whip up at home. Grab your ice cream maker, and let’s get started!
Ingredients
- 2 cups fresh cherries, pitted and chopped
- 1 cup heavy cream
- 1 cup whole milk
- 3/4 cup granulated sugar
- 1 teaspoon vanilla extract
- 1/2 teaspoon almond extract
- 1/2 cup sliced almonds
- 1 tablespoon lemon juice
Instructions
- Prepare the Cherries: In a mixing bowl, combine the chopped cherries with lemon juice and set aside for about 10 minutes.
- Mix the Base: In another bowl, whisk together the heavy cream, whole milk, granulated sugar, vanilla extract, and almond extract until the sugar is dissolved.
- Combine: Gently fold the cherries and their juices into the cream mixture, then stir in the sliced almonds.
- Chill: Refrigerate the mixture for at least an hour to ensure it is well chilled before churning.
- Churn: Pour the mixture into an ice cream maker and churn according to the manufacturer’s instructions until it reaches a soft-serve consistency.
- Freeze: Transfer the churned ice cream to an airtight container and freeze for at least 4 hours or until firm.
- Serve: Scoop into bowls and enjoy your homemade Cherry Almond Surprise!
Tropical Pineapple Coconut Swirl
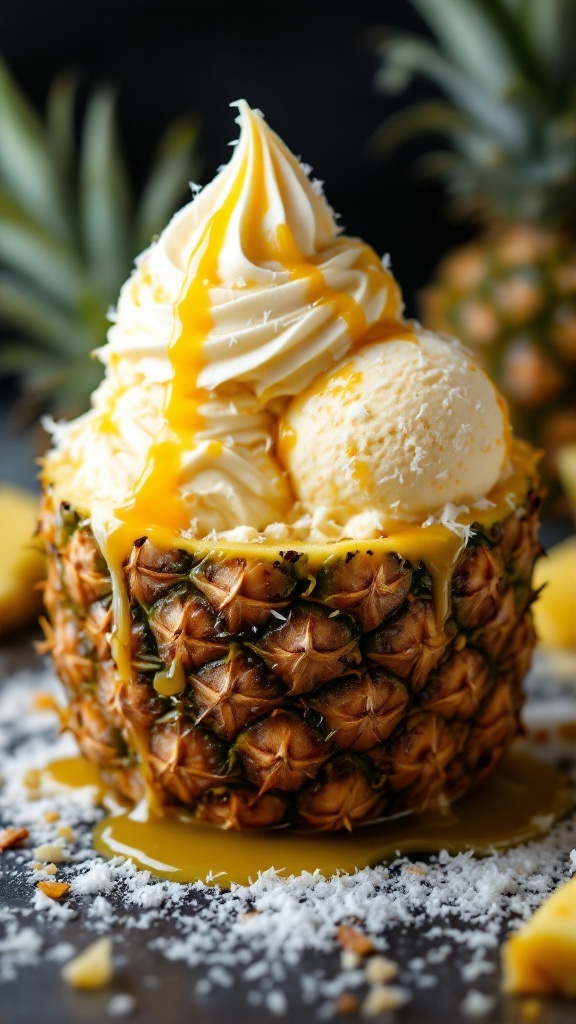
Indulging in a Tropical Pineapple Coconut Swirl ice cream is like taking a mini-vacation with every bite. This delightful treat combines the sweet, juicy flavor of fresh pineapple with the creamy richness of coconut, offering a refreshing escape even on the hottest days. It’s simple to make, requiring just a few ingredients and minimal effort, making it a perfect recipe for both the experienced chef and the curious beginner.
The vibrant combination of pineapple and coconut not only tastes like paradise, but it also looks beautiful when served. Whether enjoyed in a bowl, a cone, or straight from the pineapple shell, this ice cream is sure to be a hit at summertime gatherings or family dessert nights. Let’s dive into the recipe!
Ingredients
- 2 cups heavy cream
- 1 cup coconut milk
- 1/2 cup granulated sugar
- 1 teaspoon vanilla extract
- 1 cup fresh pineapple, diced
- 1/4 cup pineapple juice
- 1/2 cup shredded coconut (toasted if desired)
Instructions
- In a mixing bowl, whisk together the heavy cream, coconut milk, sugar, and vanilla extract until the sugar is dissolved.
- Blend the fresh pineapple with the pineapple juice until smooth, then stir into the cream mixture.
- Fold in the shredded coconut, ensuring it’s evenly distributed throughout the mixture.
- Pour the mixture into an ice cream maker and churn according to the manufacturer’s instructions, usually about 20-25 minutes.
- Transfer the churned ice cream into an airtight container and freeze for at least 4 hours to firm up before serving.
Spicy Cinnamon Chocolate
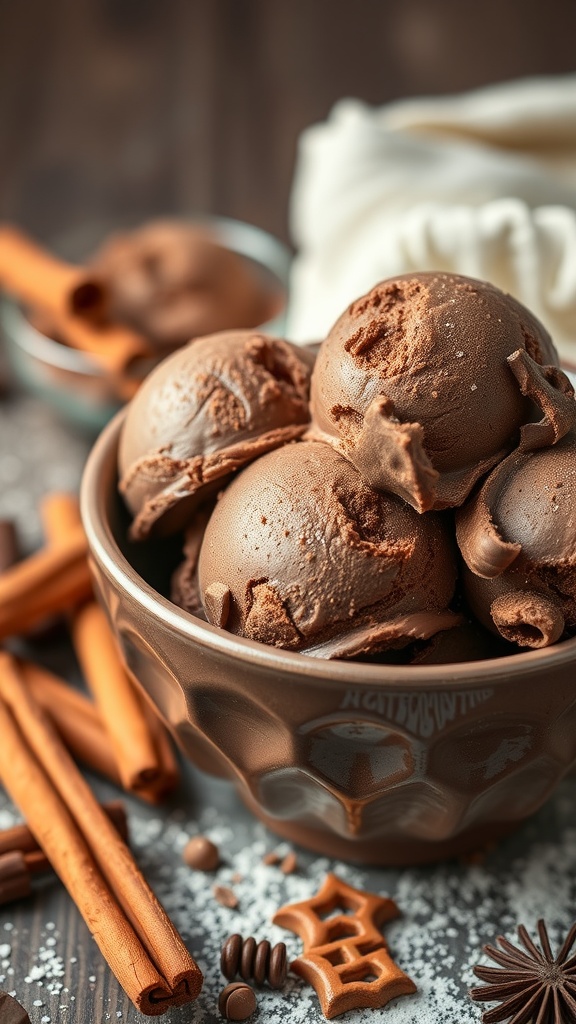
Spicy cinnamon chocolate ice cream is a delightful twist on classic flavors. The rich, creamy chocolate is perfectly balanced with a hint of warmth from cinnamon, making every bite a cozy experience. This recipe is simple enough for beginners, and you’ll be surprised at how easily you can create this indulgent treat at home.
Ideal for those who enjoy a little kick in their desserts, this ice cream is perfect for warm summer nights or as a comforting winter dessert. Simple ingredients come together to make a luxurious dessert that will have everyone asking for seconds!
Ingredients
- 2 cups heavy cream
- 1 cup whole milk
- 3/4 cup granulated sugar
- 1/2 cup unsweetened cocoa powder
- 1 teaspoon vanilla extract
- 1 teaspoon ground cinnamon
- 1/4 teaspoon cayenne pepper (adjust to taste)
- 1/2 cup chocolate chips (optional)
Instructions
- Mix the Base: In a medium bowl, whisk together the heavy cream, whole milk, sugar, cocoa powder, vanilla extract, ground cinnamon, and cayenne pepper until well combined and the sugar is dissolved.
- Chill: Cover the mixture and refrigerate for at least 2 hours, or until thoroughly chilled.
- Churn: Pour the chilled mixture into an ice cream maker and churn according to the manufacturer’s instructions, usually about 20-25 minutes.
- Add Chocolate Chips: If using, add the chocolate chips in the last few minutes of churning.
- Freeze: Transfer the churned ice cream to an airtight container and freeze for at least 4 hours or until firm before serving.
Bubblegum Fun

Indulge in a sweet treat that captures the essence of childhood with this delightful bubblegum ice cream! This recipe is all about bright colors and playful flavors, perfect for those hot summer days or any time you want to bring a little joy into your life. The creamy texture combined with the fun bubblegum flavor is sure to be a hit with both kids and adults alike.
This homemade ice cream is surprisingly simple to make, requiring just a few ingredients. You will love how easy it is to whip up a batch and impress your friends with a nostalgic flavor that takes them back in time. Let’s dive into the details!
Ingredients
- 2 cups heavy cream
- 1 cup whole milk
- 3/4 cup granulated sugar
- 1 tablespoon bubblegum flavoring
- 1/2 teaspoon salt
- 1 cup mini marshmallows
- 1/2 cup colorful sprinkles
Instructions
- Prepare the Base: In a mixing bowl, whisk together the heavy cream, whole milk, granulated sugar, bubblegum flavoring, and salt until the sugar is fully dissolved.
- Chill: Cover the mixture and refrigerate for at least 2 hours to chill thoroughly. This step helps to enhance the flavors.
- Churn: Pour the chilled mixture into an ice cream maker and churn according to the manufacturer’s instructions until it reaches a soft-serve consistency.
- Add Mix-ins: During the last few minutes of churning, add the mini marshmallows and colorful sprinkles for that extra bubblegum fun.
- Freeze: Transfer the ice cream to an airtight container and freeze for at least 4 hours or until firm. Scoop and enjoy!
Nutty Apricot Crunch
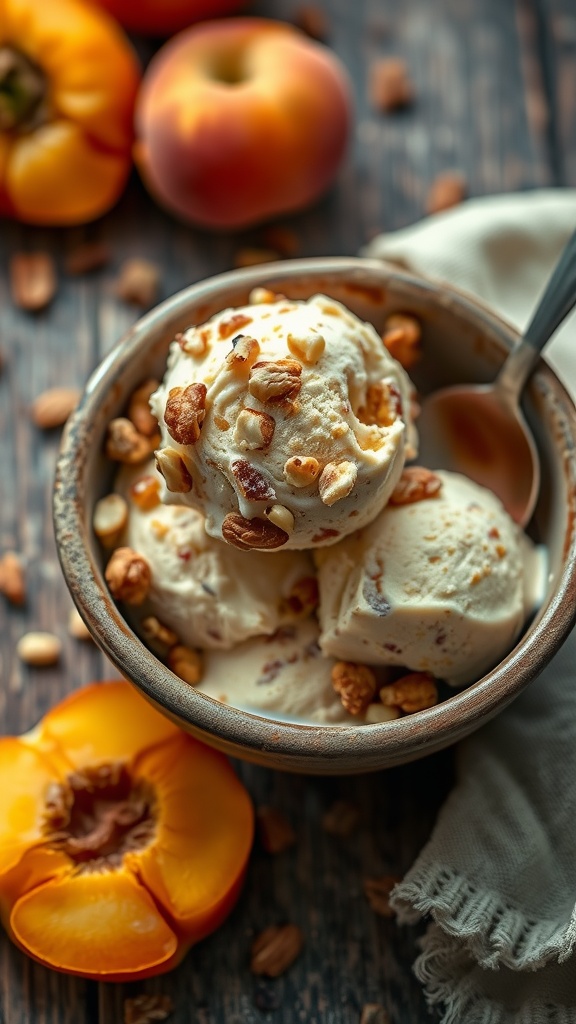
Nutty Apricot Crunch is a delightful homemade ice cream that combines the sweetness of apricots with the crunch of nuts. This recipe is simple to whip up, making it a perfect treat for a hot summer day or any time you crave something sweet and satisfying.
The smooth, creamy texture of the ice cream pairs perfectly with the chewy apricots and the satisfying crunch from the nuts. Each bite is a delightful mix of flavors and textures that will leave you coming back for more. Plus, it’s a fun way to enjoy fresh fruit while treating yourself!
Ingredients
- 2 cups heavy cream
- 1 cup whole milk
- 3/4 cup granulated sugar
- 1 teaspoon vanilla extract
- 1 cup dried apricots, chopped
- 1/2 cup chopped nuts (such as almonds or walnuts)
- 1/4 teaspoon salt
Instructions
- Prepare the Base: In a mixing bowl, combine the heavy cream, whole milk, granulated sugar, vanilla extract, and salt. Whisk until the sugar is fully dissolved.
- Add the Fruit and Nuts: Fold in the chopped dried apricots and nuts into the cream mixture until evenly distributed.
- Chill: Cover the mixture and refrigerate for at least 2 hours, or until it is thoroughly chilled.
- Churn the Ice Cream: Pour the mixture into an ice cream maker and churn according to the manufacturer’s instructions, usually about 20-30 minutes.
- Freeze: Transfer the churned ice cream to a lidded container and freeze for at least 4 hours to firm up before serving.
Pro Tips for Ice Cream Success ✨
After making hundreds of batches (seriously, my freezer is always full), here are my top tips:
- Chill everything – Your base should be COLD before churning, and pre-chill your container too
- Don’t overfill the machine – Mixtures expand as they freeze and incorporate air
- Add mix-ins at the end – Last minute of churning or fold in by hand afterward
- Be patient with freezing – Fresh ice cream needs several hours to firm up properly
- Alcohol lowers freezing point – Boozy ice creams will stay softer (and need longer to freeze)
- Watch the fat content – Too low, and you’ll get icy results; too high, and it can get greasy
- Mix it up occasionally – Home freezers can cause ice crystals to form; stirring every so often helps
Storage Secrets 🧊
To keep your homemade ice cream at its best:
- Store in shallow, airtight containers
- Place plastic wrap directly on the surface before putting the lid on
- Keep in the coldest part of your freezer
- Let sit at room temperature for 5-10 minutes before scooping
- Use a warm scoop (run under hot water and dry) for perfect scoops
Frequently Asked Questions ❓
Do I need an ice cream maker? Not necessarily! The no-churn recipes work surprisingly well. That said, an ice cream maker creates a smoother texture and is worth the investment if you plan to make ice cream regularly.
Why is my ice cream icy? This could be due to low fat content, not churning long enough, or interruptions in the freezing process. Using ingredients at room temperature or not chilling the base adequately before churning can also cause iciness.
Can I use alternative sweeteners? Yes, but it may affect texture. Honey, maple syrup, and agave work well. For keto or low-carb options, erythritol and allulose are better than stevia or monk fruit as they help create a smoother texture.
How long does homemade ice cream last? About 1-2 weeks for optimal texture, though it’s safe to eat for longer. The lack of commercial stabilizers means homemade ice cream develops ice crystals faster than store-bought versions.
Why add alcohol to ice cream? Besides flavor, alcohol lowers the freezing point, resulting in a softer, more scoopable ice cream. Just don’t add too much or it won’t freeze properly!
Can I make these dairy-free? Absolutely! Coconut milk makes an excellent base for dairy-free ice creams. For a more neutral flavor, cashew cream or commercial oat creamer also work well.
There you have it – 18 amazing homemade ice cream recipes that’ll make you the hero of every summer gathering! From classics done right to innovative flavor combinations, there’s something here for everyone. What I love most about making ice cream is how it connects people – there’s something magical about sharing a homemade frozen treat that brings pure joy to faces of all ages.
Which flavor will you try first? I’m betting that once you start making your own ice cream, you’ll be just as obsessed as I am. Happy churning! 🍦