

22 Delightful Easter Dessert Recipes Everyone Will Love 🐰
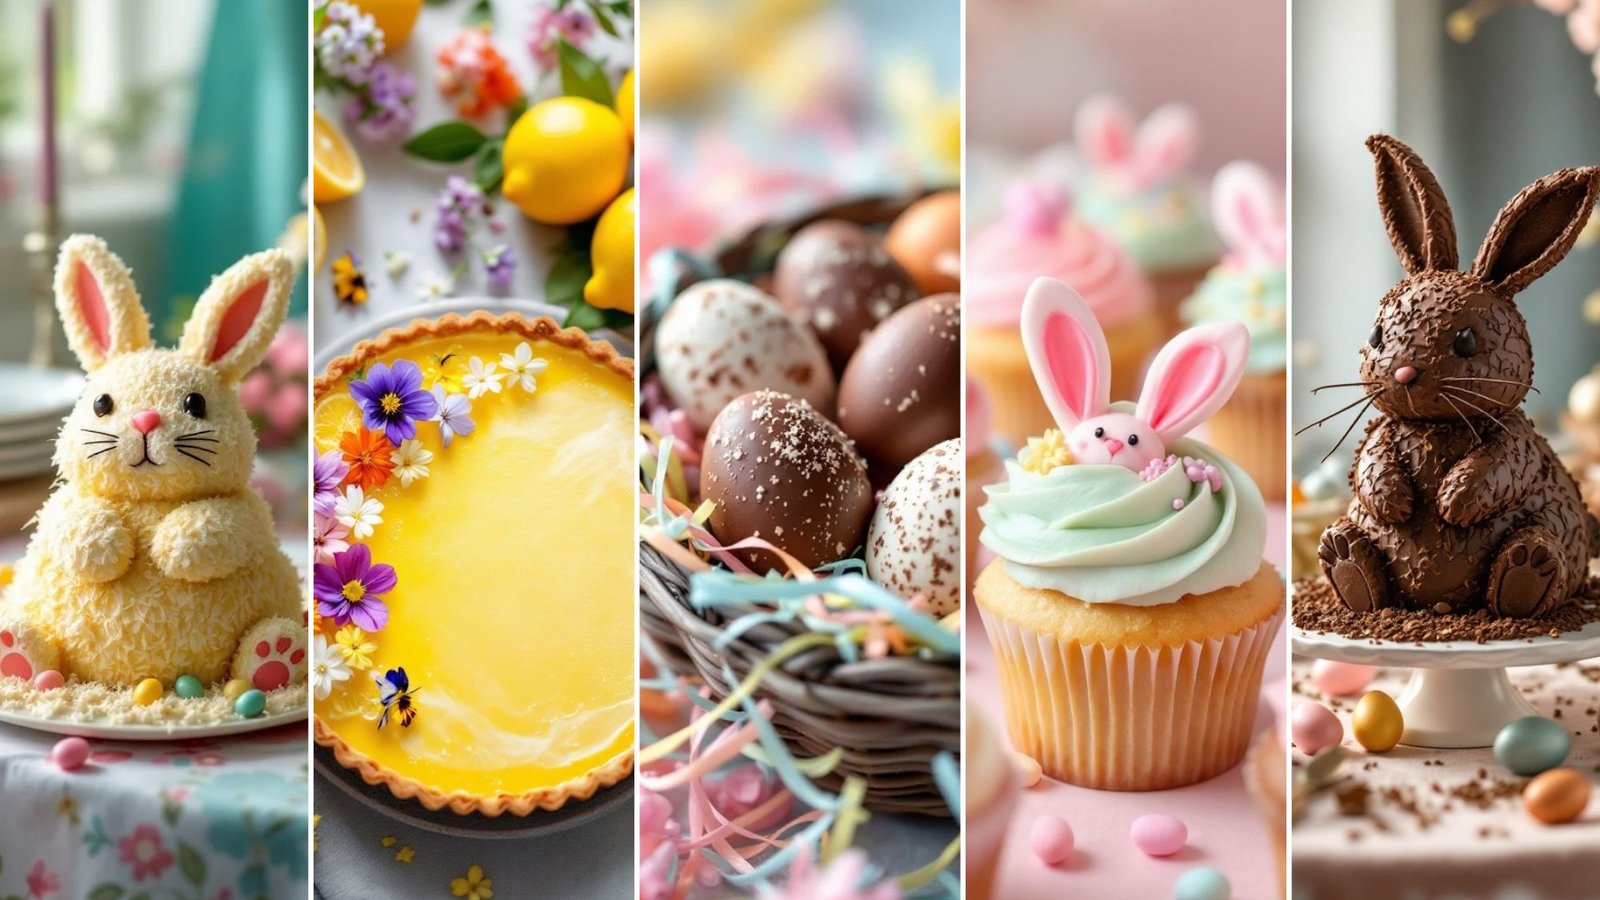
Hey there, fellow dessert lover! Easter’s just around the corner, and let’s be honest – is it even Easter without some incredible sweet treats on the table? I don’t think so! 😉 As someone who’s been baking up Easter storms for years, I’ve pulled together what I consider the absolute best Easter dessert recipes that’ll have your family hunting for seconds instead of eggs.
From classic carrot cakes to adorable bunny-shaped cookies, these spring desserts are guaranteed to bring some extra joy to your celebration. Ready to make your Easter Sunday the sweetest one yet? Let’s hop to it!
Carrot Cake Cupcakes with Cream Cheese Frosting
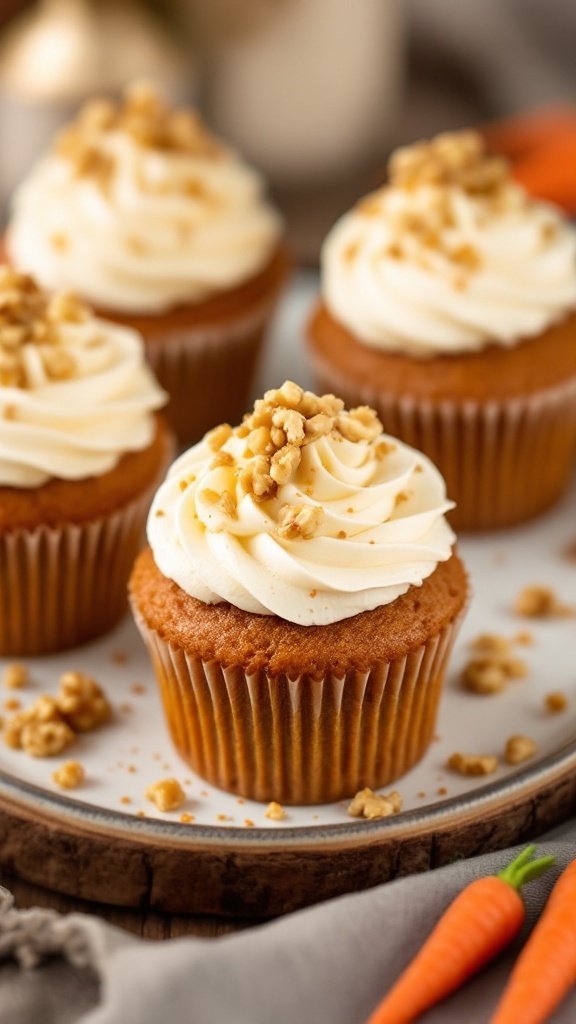
Who doesn’t love a good carrot cake? But honestly, individual cupcakes are so much easier to serve (and sneak extras when nobody’s looking).
Carrot cake cupcakes are a delightful twist on a classic dessert. These cupcakes are moist and flavorful, thanks to the grated carrots that blend seamlessly into the batter. The warm spices, like cinnamon and nutmeg, add depth to each bite, making them perfect for spring celebrations. With a creamy, tangy cream cheese frosting on top, every bite is a little piece of heaven.
I made these for last year’s family gathering and my nephew – who claims to hate vegetables – ate three without realizing carrots were involved. Talk about a win!
This recipe is not only delicious but also simple to make. Even if you’re new to baking, you’ll find that whipping up these cupcakes is a breeze. They’re ideal for Easter gatherings or any festive occasion!
Ingredients
- 1 cup all-purpose flour
- 1 teaspoon baking powder
- 1/2 teaspoon baking soda
- 1/2 teaspoon salt
- 1 teaspoon ground cinnamon
- 1/4 teaspoon ground nutmeg
- 1/2 cup granulated sugar
- 1/2 cup brown sugar, packed
- 1/2 cup vegetable oil
- 2 large eggs
- 1 teaspoon vanilla extract
- 1 cup grated carrots (about 2 medium carrots)
- 1/2 cup crushed walnuts (optional)
- 1 cup cream cheese, softened
- 2 cups powdered sugar
- 1 teaspoon vanilla extract (for frosting)
Instructions
- Preheat the oven to 350°F (175°C) and line a cupcake tin with liners.
- In a bowl, whisk together the flour, baking powder, baking soda, salt, cinnamon, and nutmeg.
- In a separate bowl, mix the granulated sugar, brown sugar, oil, eggs, and vanilla until well combined. Gradually add the dry ingredients to the wet mixture until just combined.
- Fold in the grated carrots and crushed walnuts, if using.
- Fill each cupcake liner about two-thirds full with batter. Bake for 18-20 minutes, or until a toothpick inserted in the center comes out clean.
- Let the cupcakes cool completely before frosting.
- To make the frosting, beat the softened cream cheese, powdered sugar, and vanilla together until smooth and creamy. Spread or pipe onto the cooled cupcakes.
- Top with additional crushed walnuts if desired and enjoy!
Pistachio and Rosewater Cheesecake
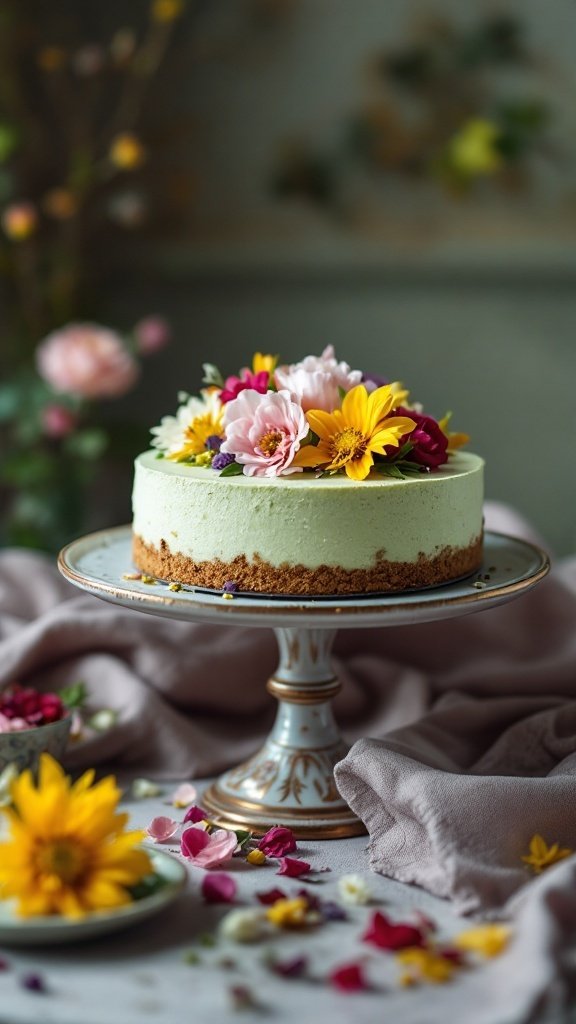
This Pistachio and Rosewater Cheesecake is a delightful treat that combines the nutty flavor of pistachios with the floral notes of rosewater. It’s creamy and rich, making it a lovely dessert for Easter gatherings. With its vibrant green color and beautiful toppings, it not only tastes delicious but also looks stunning on your dessert table.
Making this cheesecake is simpler than you might think. The crust is made from crushed biscuits, while the filling involves blending cream cheese with ground pistachios and rosewater. Just a few steps, and you’ll have a show-stopping dessert that’s sure to impress your guests!
Ingredients
- 1 1/2 cups graham cracker crumbs
- 1/4 cup unsalted butter, melted
- 2 cups cream cheese, softened
- 1 cup powdered sugar
- 1/2 cup ground pistachios
- 1/4 cup rosewater
- 1/2 teaspoon vanilla extract
- 1 cup heavy cream
- Fresh flowers for decoration (optional)
Instructions
- Prepare the Crust: Preheat your oven to 350°F (175°C). In a bowl, mix graham cracker crumbs with melted butter until well combined. Press the mixture firmly into the bottom of a springform pan. Bake for 8-10 minutes, then let it cool.
- Make the Filling: In a large bowl, beat the cream cheese until smooth. Gradually add powdered sugar, ground pistachios, rosewater, and vanilla extract, mixing until fully combined.
- Whip the Cream: In a separate bowl, whip the heavy cream until stiff peaks form. Gently fold the whipped cream into the cream cheese mixture until smooth.
- Assemble the Cheesecake: Pour the filling over the cooled crust and smooth the top. Refrigerate for at least 4 hours or overnight to set.
- Garnish and Serve: Once set, remove the cheesecake from the springform pan. Decorate with fresh flowers if desired and slice to serve.
Chocolate Coconut Easter Eggs
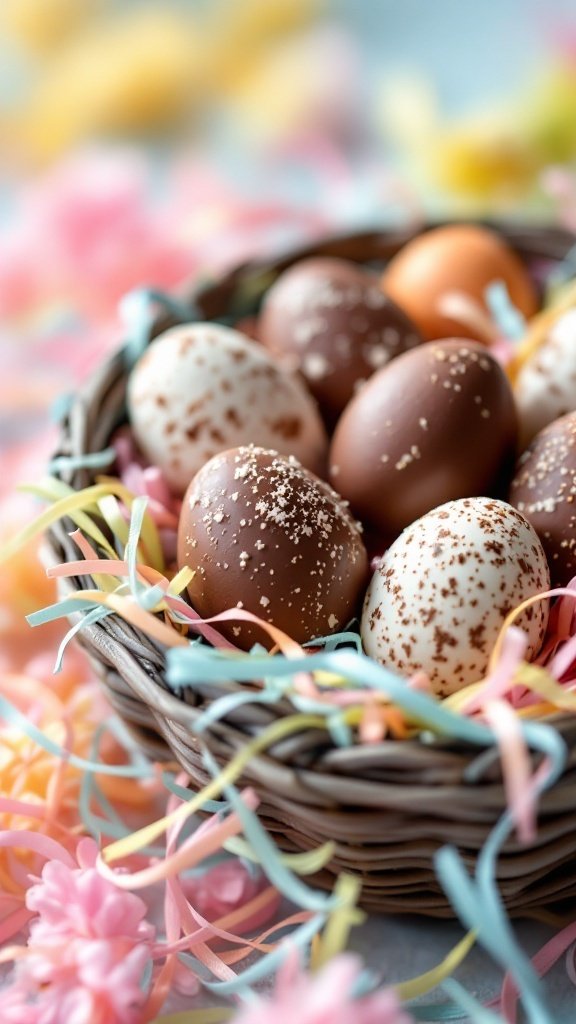
Chocolate Coconut Easter Eggs are a delightful treat that perfectly captures the spirit of Easter. These sweet, chewy bites combine rich chocolate with shredded coconut, creating a flavor that’s both indulgent and refreshing. They are simple to make, making them a fun project for families or anyone looking to celebrate the holiday with a homemade dessert.
The combination of creamy chocolate coating and the sweet, chewy coconut filling is sure to please chocolate lovers of all ages. Plus, these treats can be made ahead of time, allowing you to enjoy your Easter festivities without the last-minute rush!
Ingredients
- 3 cups sweetened shredded coconut
- 1/4 cup unsweetened cocoa powder
- 1/2 cup sweetened condensed milk
- 1 teaspoon vanilla extract
- 1/2 cup semi-sweet chocolate chips
- 1 tablespoon coconut oil
- 1 cup chocolate sprinkles (optional)
Instructions
- Prepare the Coconut Mixture: In a bowl, combine shredded coconut, cocoa powder, sweetened condensed milk, and vanilla extract. Mix until well combined.
- Shape the Eggs: Take small portions of the mixture and shape them into egg-like forms. Place them on a parchment-lined baking sheet and refrigerate for about 30 minutes until firm.
- Melt the Chocolate: In a microwave-safe bowl, combine chocolate chips and coconut oil. Microwave in 30-second intervals, stirring in between, until melted and smooth.
- Coat the Eggs: Dip each chilled coconut egg into the melted chocolate, ensuring they are fully coated. Use a fork to lift them out and let any excess chocolate drip off.
- Add Sprinkles: If desired, roll the coated eggs in chocolate sprinkles before placing them back on the baking sheet.
- Chill: Return the chocolate-covered eggs to the refrigerator for about 15 minutes to set.
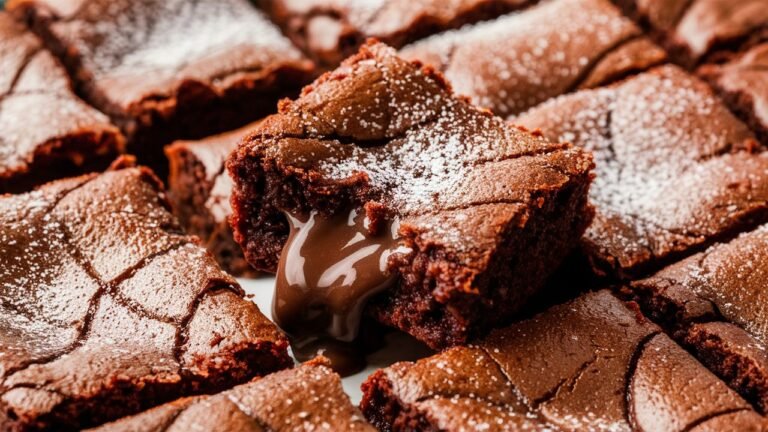
Mini Egg Chocolate Brownies

Mini Egg Chocolate Brownies are a delightful treat that perfectly combines rich, fudgy brownie goodness with the fun crunch of mini chocolate eggs. They are simple to make, making them an ideal dessert choice for Easter celebrations or any gathering. With each bite, you’ll experience the intense chocolate flavor paired with the sweetness of the mini eggs, creating a festive and flavorful dessert.
These brownies are not only visually appealing but also satisfy any chocolate cravings. Whether you’re serving them at an Easter brunch or enjoying them as an everyday snack, they are sure to bring a smile to everyone’s face. Plus, they come together quickly, so you can whip them up in no time!
Ingredients
- 1 cup unsalted butter
- 2 cups granulated sugar
- 4 large eggs
- 1 teaspoon vanilla extract
- 1 cup all-purpose flour
- 1 cup unsweetened cocoa powder
- 1/2 teaspoon salt
- 1 cup mini chocolate eggs (plus extra for topping)
Instructions
- Preheat your oven to 350°F (175°C) and grease a 9×13 inch baking pan.
- In a large saucepan, melt the butter over low heat. Remove from heat and stir in the sugar, eggs, and vanilla until smooth.
- Add the flour, cocoa powder, and salt, mixing until just combined. Gently fold in the mini chocolate eggs.
- Pour the brownie batter into the prepared pan and spread it evenly. Top with extra mini eggs for decoration.
- Bake for 25-30 minutes or until a toothpick inserted in the center comes out with a few moist crumbs. Let cool before cutting into squares.
Spring Berry Pavlova
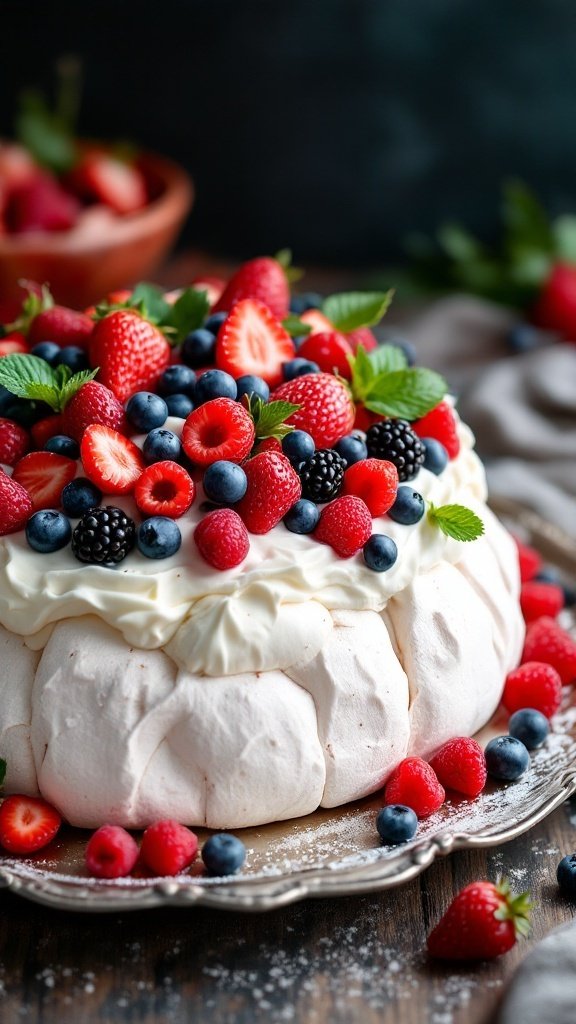
Spring Berry Pavlova is a delightful dessert that combines a crispy meringue shell with a fluffy interior, topped with a generous layer of whipped cream and a mix of fresh berries. The sweet and slightly tangy flavors of the berries perfectly complement the crispness of the meringue and the creaminess of the topping, creating a treat that feels both light and indulgent. This recipe is simple enough for anyone to master, making it a great choice for gatherings or family celebrations.
The colorful berries not only enhance the visual appeal but also add a burst of freshness that screams spring. Whether you’re hosting an Easter brunch or just want to enjoy a sweet treat, this pavlova is sure to impress. Let’s dive into how to create this beautiful dessert!
Ingredients
- 4 large egg whites
- 1 cup granulated sugar
- 1 teaspoon white vinegar
- 1 teaspoon cornstarch
- 1 cup heavy cream
- 2 tablespoons powdered sugar
- 1 teaspoon vanilla extract
- 2 cups mixed berries (strawberries, blueberries, raspberries, blackberries)
- Fresh mint leaves (for garnish)
Instructions
- Preheat the oven to 275°F (135°C). Line a baking sheet with parchment paper and draw a 9-inch circle on the parchment.
- In a large mixing bowl, beat the egg whites with an electric mixer on medium speed until soft peaks form.
- Gradually add the granulated sugar, one tablespoon at a time, while continuing to beat until the mixture is glossy and stiff peaks form.
- Gently fold in the vinegar and cornstarch until just combined.
- Transfer the meringue mixture to the prepared baking sheet, spreading it within the circle and creating a slight indentation in the center.
- Bake for 1 hour, then turn off the oven and let the meringue cool in the oven with the door slightly open.
- Once cool, whip the heavy cream with powdered sugar and vanilla extract until soft peaks form.
- Carefully transfer the meringue to a serving plate. Top with whipped cream and arrange the mixed berries on top.
- Garnish with fresh mint leaves before serving.
Raspberry Lemon Bars
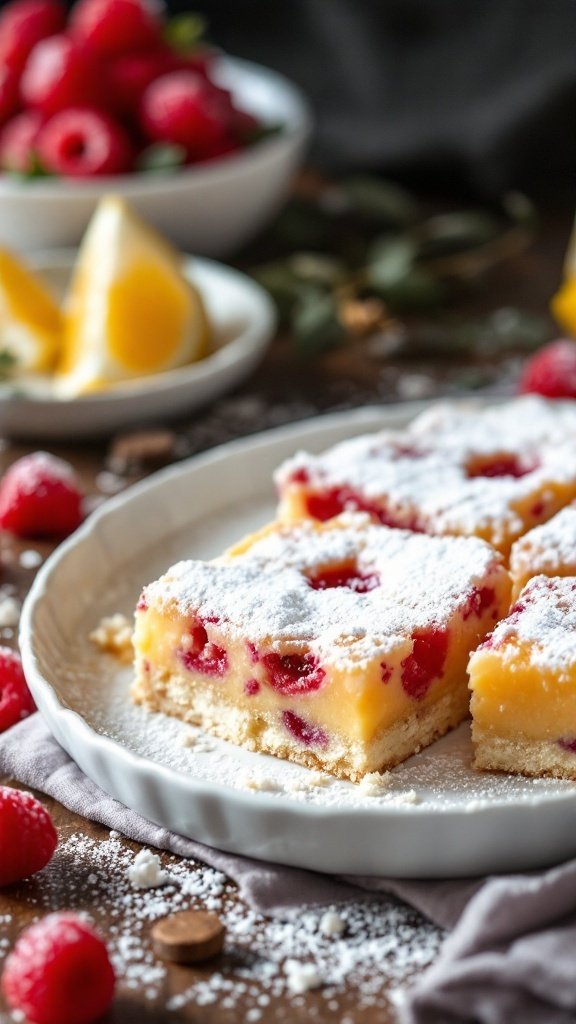
Raspberry lemon bars are a delightful treat that combines the tartness of lemons with the sweetness of fresh raspberries. The bright citrus flavor paired with the juicy berries makes for a refreshing dessert that’s perfect for spring celebrations like Easter.
These bars are surprisingly easy to make, requiring just a few simple ingredients. The buttery crust provides a lovely contrast to the creamy lemon and raspberry filling. Whether enjoyed with family or shared at a gathering, these lemon bars are sure to impress!
Ingredients
- 1 cup all-purpose flour
- 1/2 cup unsalted butter, softened
- 1/4 cup powdered sugar
- 1/4 teaspoon salt
- 2 large eggs
- 1 cup granulated sugar
- 1/4 cup fresh lemon juice
- 1 teaspoon lemon zest
- 1 cup fresh raspberries
- Powdered sugar for dusting
Instructions
- Preheat the oven to 350°F (175°C). Grease an 8-inch square baking dish.
- Make the Crust: In a mixing bowl, combine flour, powdered sugar, and salt. Cut in the softened butter until the mixture resembles coarse crumbs. Press the mixture evenly into the bottom of the prepared baking dish.
- Bake the Crust: Bake the crust for about 15 minutes or until lightly golden. Remove from the oven and let it cool slightly.
- Prepare the Filling: In a separate bowl, whisk together the eggs, granulated sugar, lemon juice, and lemon zest until smooth. Gently fold in the raspberries.
- Pour the Filling: Pour the raspberry mixture over the baked crust and return to the oven.
- Bake Again: Bake for an additional 20-25 minutes or until the filling is set. Let it cool completely before slicing into squares.
- Serve: Dust with powdered sugar before serving for a touch of sweetness.
Lemon Meringue Pie with a Twist
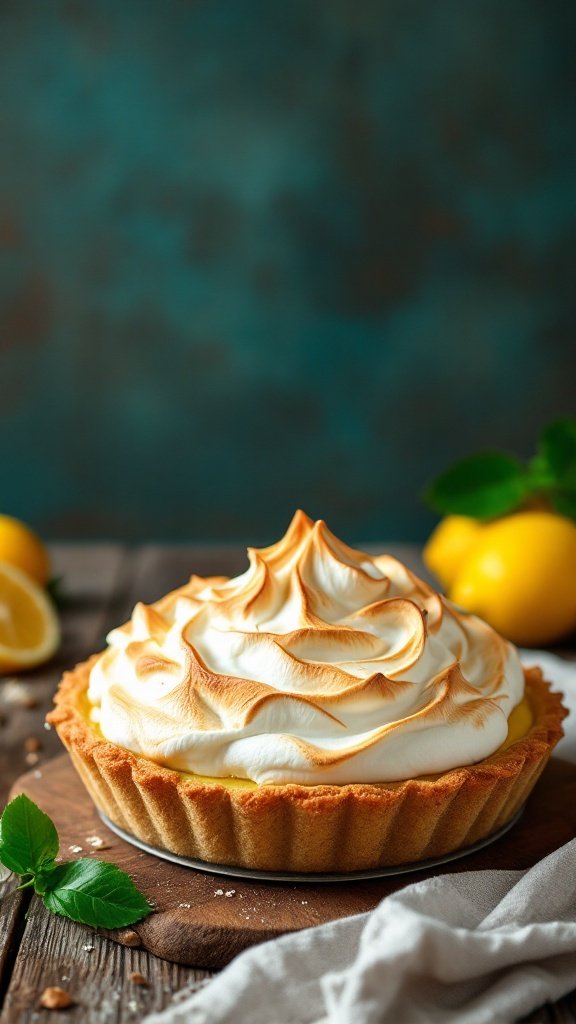
This Lemon Meringue Pie with a Twist brings a delightful zing to your Easter dessert table. The bright, citrusy lemon filling is perfectly balanced with a fluffy, toasted meringue topping, creating a deliciously sweet and tart experience. Simple to make, this pie is sure to impress your family and friends.
The crust is buttery and flaky, providing a wonderful contrast to the smooth lemon filling and airy meringue. It’s a dish that combines classic flavors with a fresh twist, making it a delightful addition to your Easter celebrations.
Ingredients
- 1 pre-made pie crust
- 1 cup granulated sugar
- 1/4 cup cornstarch
- 1/4 teaspoon salt
- 1 1/2 cups water
- 3 large egg yolks, beaten
- 1/2 cup fresh lemon juice
- 1 tablespoon lemon zest
- 2 tablespoons unsalted butter
- 3 large egg whites
- 1/4 teaspoon cream of tartar
- 1/2 cup powdered sugar
Instructions
- Prepare the Crust: Preheat your oven to 350°F (175°C). Place the pie crust in a pie dish and bake according to package instructions until golden. Allow it to cool.
- Make the Filling: In a saucepan, combine granulated sugar, cornstarch, and salt. Gradually whisk in water, then cook over medium heat, stirring until thickened. Remove from heat and whisk in beaten egg yolks, lemon juice, lemon zest, and butter until smooth.
- Fill the Crust: Pour the lemon filling into the cooled pie crust, smoothing it out evenly.
- Prepare the Meringue: In a clean bowl, beat egg whites with cream of tartar until soft peaks form. Gradually add powdered sugar, continuing to beat until stiff peaks form.
- Top the Pie: Spread the meringue over the lemon filling, ensuring it touches the crust to prevent shrinking. Use a spatula to create swirls and peaks on top.
- Brown the Meringue: Bake in the oven for about 10-12 minutes, until the meringue is lightly golden. Allow to cool before serving.
Easter Bunny Cake

The Easter Bunny Cake is a delightful and whimsical dessert that brings a touch of fun to any spring celebration. This cake is not only visually appealing, resembling a cute bunny, but it also offers a deliciously sweet flavor that everyone will enjoy. With its fluffy texture and creamy frosting, it’s a treat that will surely impress your guests.
Making this cake is easier than it looks! With simple ingredients and straightforward steps, you can create this charming centerpiece for your Easter festivities without the stress. Gather your family or friends to help decorate, and watch as the smiles grow with each slice!
Ingredients
- 1 box of yellow cake mix
- 3 large eggs
- 1 cup of water
- 1/2 cup of vegetable oil
- 1 container of buttercream frosting
- 1 cup shredded coconut
- 2 large marshmallows (for the tail)
- Colored candy for decoration (like jelly beans)
- Chocolate chips (for the eyes)
Instructions
- Prepare the Cake: Preheat your oven according to the cake mix instructions. Grease and flour two round cake pans. Prepare the cake mix by combining cake mix, eggs, water, and vegetable oil in a large bowl, then mix until smooth.
- Bake the Cakes: Pour the batter evenly into the prepared pans and bake according to the package instructions. Once done, let them cool completely in the pans before transferring them to a wire rack.
- Shape the Bunny: Once cooled, use one cake for the body and cut the other cake in half to form the bunny’s head. Stack the head on top of the body and use leftover cake scraps to shape the ears.
- Frost the Cake: Cover the entire cake in buttercream frosting. Then, sprinkle shredded coconut over the frosting to create a fluffy texture.
- Add the Decorations: Use chocolate chips for the eyes, and place the marshmallow on top for the bunny’s tail. Finish off with colored candy around the base for a festive touch.
Chocolate Chip Cookie Dough Truffles

Chocolate Chip Cookie Dough Truffles are a delightful treat that captures the nostalgia of raw cookie dough, all while being safe to eat! These little bites are a perfect combination of creamy, sweet cookie dough coated in rich chocolate, making them irresistible for any chocolate lover. Plus, they’re incredibly simple to make, making them a great option for gatherings or just a special treat for yourself.
With their smooth texture and the crunch of mini chocolate chips, these truffles will satisfy your sweet tooth and impress your friends and family. The best part? You can whip them up in no time, making them a quick addition to your Easter dessert lineup or any celebration!
Ingredients
- 1 cup all-purpose flour
- 1/2 cup unsalted butter, softened
- 3/4 cup brown sugar, packed
- 1/4 cup granulated sugar
- 2 teaspoons vanilla extract
- 1/4 teaspoon salt
- 1/2 cup mini chocolate chips
- 1 1/2 cups chocolate chips (for coating)
- Sprinkles (optional, for decoration)
Instructions
- Prepare the Dough: In a bowl, cream together the softened butter, brown sugar, and granulated sugar until light and fluffy. Mix in the vanilla and salt.
- Add Flour: Gradually add the all-purpose flour, mixing until just combined. Fold in the mini chocolate chips.
- Chill: Cover the dough and refrigerate for about 30 minutes to help it firm up.
- Form Truffles: Once chilled, scoop out small amounts of dough and roll them into balls. Place the balls on a baking sheet lined with parchment paper.
- Coat in Chocolate: Melt the chocolate chips in a microwave or double boiler. Dip each dough ball into the melted chocolate and coat evenly. Return them to the baking sheet.
- Decorate: If desired, sprinkle with additional toppings before the chocolate sets.
- Chill Again: Refrigerate the truffles until the chocolate hardens, about 30 minutes, before serving.
Vanilla Bean Panna Cotta with Berry Sauce
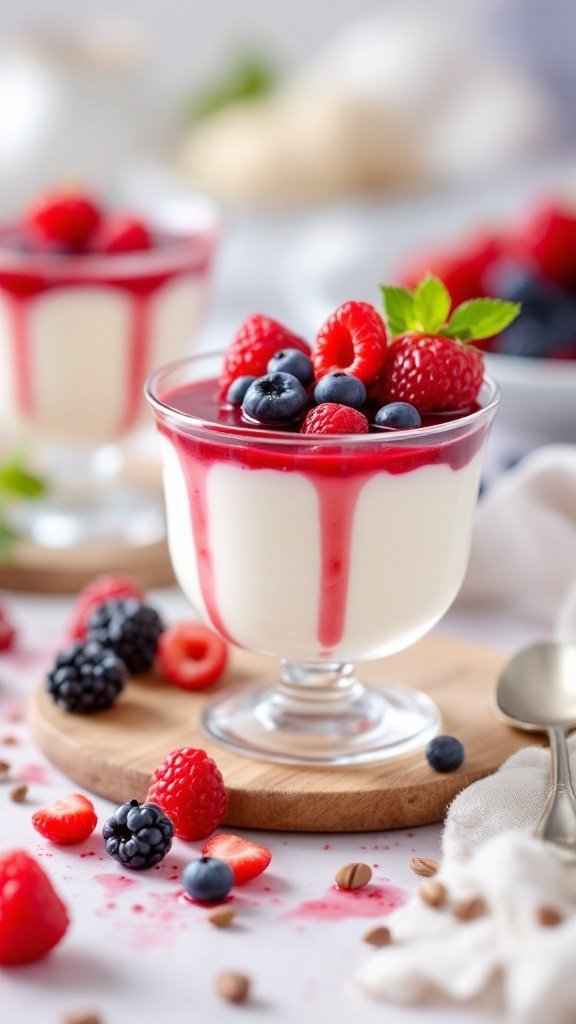
Vanilla bean panna cotta is a classic Italian dessert that’s both creamy and elegant. The rich, silky texture pairs beautifully with a tangy berry sauce, making it a delightful treat for any occasion, especially Easter. This dessert is simple to make and can be prepared a day in advance, giving you more time to enjoy with family and friends.
The panna cotta is subtly sweet with a hint of vanilla, while the berry sauce adds a refreshing burst of flavor and color. It’s a charming way to end a festive meal, and garnishing it with fresh berries enhances its appeal. This recipe is a lovely addition to your Easter dessert table.
Ingredients
- 2 cups heavy cream
- 1/2 cup granulated sugar
- 1 teaspoon vanilla bean paste
- 1 packet (1/4 ounce) unflavored gelatin
- 3 tablespoons cold water
- 1 cup mixed berries (like raspberries, strawberries, and blueberries)
- 2 tablespoons honey or maple syrup
Instructions
- Prepare the Gelatin: In a small bowl, combine the gelatin and cold water. Let it sit for about 5 minutes until it swells.
- Heat the Cream: In a saucepan, heat the heavy cream and sugar over medium heat, stirring until the sugar dissolves. Remove from heat and stir in the vanilla bean paste.
- Add the Gelatin: Once the cream mixture is warm, add the gelatin and stir until completely dissolved.
- Cool and Chill: Pour the mixture into serving cups or molds and refrigerate for at least 4 hours or until set.
- Make the Berry Sauce: In a small saucepan, combine the mixed berries and honey. Cook over medium heat until the berries break down and form a sauce, about 5 minutes. Allow it to cool.
- Serve: Once the panna cotta is set, top with the berry sauce and fresh berries before serving.
Peanut Butter Easter Eggs

Peanut Butter Easter Eggs are a delightful treat that combines the rich, creamy taste of peanut butter with a sweet chocolate coating. They are simple to make and provide a lovely balance of flavors that everyone will enjoy. These no-bake goodies are perfect for Easter gatherings and are sure to bring a smile to your face.
Whether you’re a fan of peanut butter or just looking for a fun dessert to make with the kids, this recipe is an easy choice. The process is straightforward and requires just a few ingredients, making it a terrific option for any skill level in the kitchen.
Ingredients
- 1 cup creamy peanut butter
- 2 cups powdered sugar
- 1 teaspoon vanilla extract
- 1/4 cup unsalted butter, softened
- 2 cups milk chocolate chips
- 1 tablespoon vegetable oil
- Optional: drizzle of white chocolate for decoration
Instructions
- Mix the Ingredients: In a large bowl, combine peanut butter, powdered sugar, vanilla extract, and softened butter. Stir until well blended and smooth.
- Shape the Eggs: Using your hands, form the mixture into egg shapes and place them on a baking sheet lined with parchment paper. Refrigerate for about 30 minutes to firm up.
- Melt the Chocolate: In a microwave-safe bowl, melt the milk chocolate chips and vegetable oil in 30-second intervals, stirring between each, until smooth.
- Coat the Eggs: Remove the peanut butter eggs from the refrigerator. Dip each egg into the melted chocolate, ensuring it’s fully coated. Place back on the parchment paper.
- Decorate: If desired, melt some white chocolate and drizzle it over the coated eggs for added flair. Allow the chocolate to set before serving.
Mango Coconut Delight Parfaits
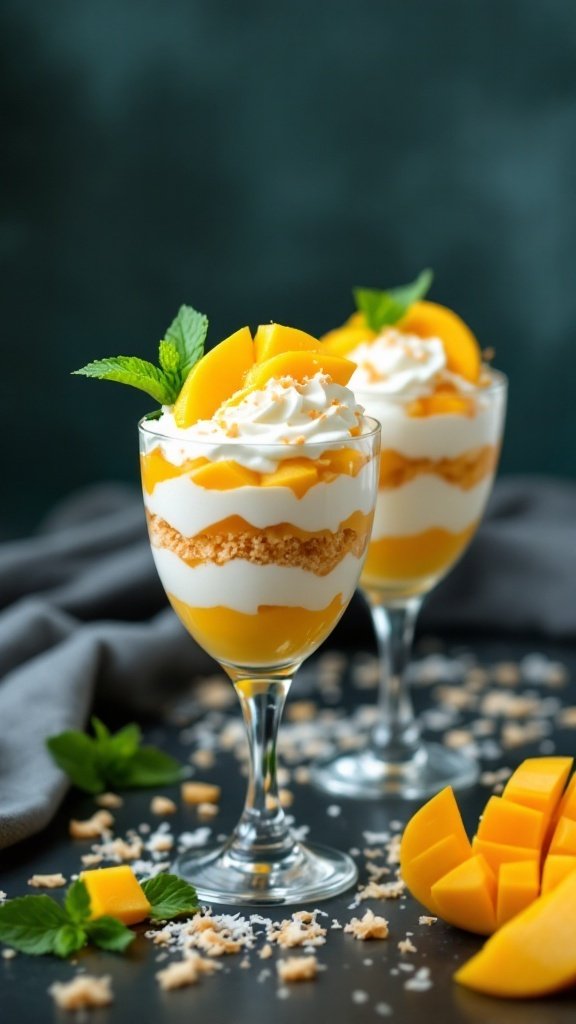
Mango Coconut Delight Parfaits are a delightful treat that showcases the tropical flavors of ripe mango and creamy coconut. The layers of smooth mango puree, light whipped cream, and crunchy coconut create a refreshing dessert that’s perfect for Easter celebrations. This recipe is easy to whip up, making it a fantastic choice for both novice and experienced bakers alike.
Each spoonful offers a burst of sweetness and a hint of coconut, balanced by the creamy texture. These parfaits can be prepared in advance, allowing you to enjoy the holiday without the stress of last-minute baking. Let’s dive into the recipe!
Ingredients
- 2 large ripe mangoes, peeled and diced
- 1 cup coconut milk
- 1 cup heavy cream
- 1/4 cup powdered sugar
- 1 teaspoon vanilla extract
- 1 cup crushed graham crackers
- 1/4 cup shredded coconut (toasted, for garnish)
- Fresh mint leaves (for garnish)
Instructions
- Prepare the Mango Puree: In a blender, combine the diced mangoes and coconut milk. Blend until smooth. You can adjust the sweetness by adding a little sugar if needed.
- Whip the Cream: In a mixing bowl, whip the heavy cream, powdered sugar, and vanilla extract until soft peaks form. Be careful not to overwhip.
- Assemble the Parfaits: In serving glasses, layer the mango puree, whipped cream, and crushed graham crackers. Repeat the layers until the glasses are full.
- Chill: Place the parfaits in the refrigerator for at least 30 minutes to set.
- Garnish and Serve: Before serving, top with toasted shredded coconut and fresh mint leaves for a festive touch.
Chocolate Hazelnut Tart
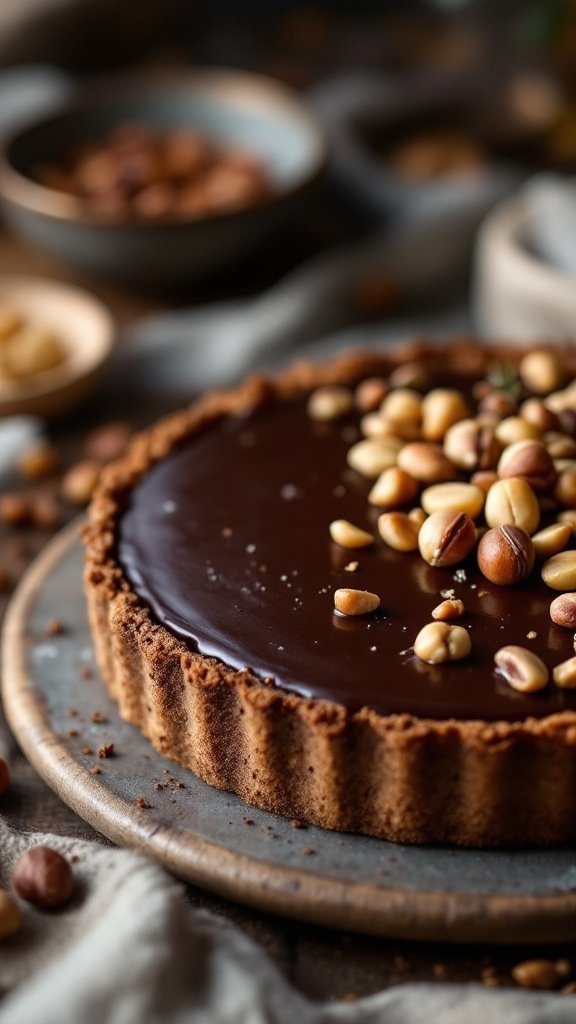
This Chocolate Hazelnut Tart is a delightful dessert that combines rich chocolate with the nutty flavor of hazelnuts. The crust is buttery and crumbly, providing a perfect base for the luscious filling. It’s a simple recipe that anyone can follow, making it a great choice for your Easter celebration.
With its smooth texture and balanced sweetness, this tart is sure to impress your friends and family. Not only does it taste divine, but it also looks beautiful on any dessert table. Plus, it’s easy to make ahead of time, allowing you to enjoy the festivities without stress.
Ingredients
- 1 1/2 cups graham cracker crumbs
- 1/2 cup unsalted butter, melted
- 1/4 cup granulated sugar
- 1 cup hazelnut spread
- 1 cup heavy cream
- 8 ounces semi-sweet chocolate, chopped
- 1 teaspoon vanilla extract
- 1/2 cup toasted hazelnuts, chopped
Instructions
- Make the Crust: Preheat your oven to 350°F (175°C). In a bowl, combine graham cracker crumbs, melted butter, and sugar. Press the mixture into a tart pan. Bake for 10 minutes and let it cool.
- Prepare the Filling: In a saucepan, heat the heavy cream until it just begins to simmer. Remove from heat and add chopped chocolate. Stir until smooth, then mix in hazelnut spread and vanilla extract.
- Assemble the Tart: Pour the chocolate mixture into the cooled crust, smoothing the top with a spatula. Refrigerate for at least 2 hours until the filling is set.
- Finish with Toppings: Before serving, sprinkle the tart with chopped toasted hazelnuts for added crunch and flavor. Slice and enjoy!
Caramelized Pineapple Upside-Down Cake

Caramelized Pineapple Upside-Down Cake is a delightful dessert that combines sweet, juicy pineapple with a rich, buttery cake. The caramelization of the pineapple adds a wonderful depth of flavor, making each slice a treat. This cake is not only delicious but also simple to make, making it a great choice for Easter celebrations or any gathering.
The warm, gooey topping paired with the soft cake creates a lovely contrast that will have everyone reaching for seconds. With just a few ingredients and easy steps, you can whip up this charming dessert that’s sure to impress.
Ingredients
- 1/4 cup unsalted butter
- 1/2 cup brown sugar, packed
- 1 can (20 oz) sliced pineapple, drained
- Maraschino cherries (optional)
- 1 cup all-purpose flour
- 1 cup granulated sugar
- 1/2 cup milk
- 2 large eggs
- 1 teaspoon baking powder
- 1/2 teaspoon vanilla extract
Instructions
- Preheat the oven to 350°F (175°C). In a round cake pan, melt the butter over low heat, then sprinkle the brown sugar evenly on top.
- Arrange the pineapple slices and cherries in the pan, covering the bottom.
- In a mixing bowl, beat together the flour, granulated sugar, milk, eggs, baking powder, and vanilla until smooth.
- Pour the batter over the pineapple arrangement, smoothing it out gently.
- Bake for 30-35 minutes, or until a toothpick inserted into the center comes out clean.
- Allow the cake to cool for a few minutes before inverting it onto a serving plate. Serve warm or at room temperature.
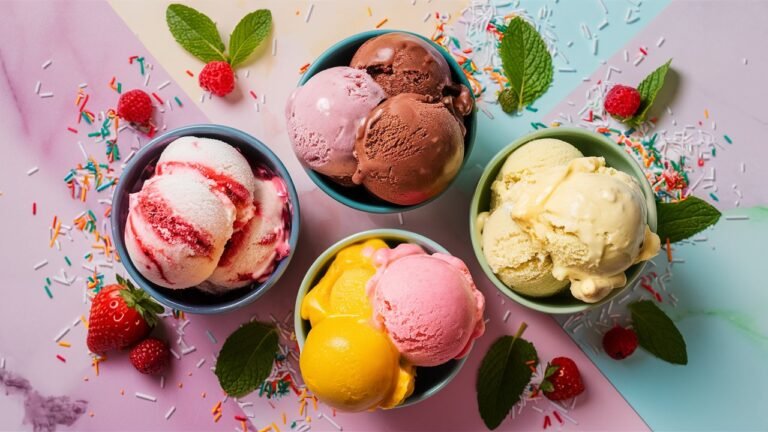
Lavender Honey Ice Cream
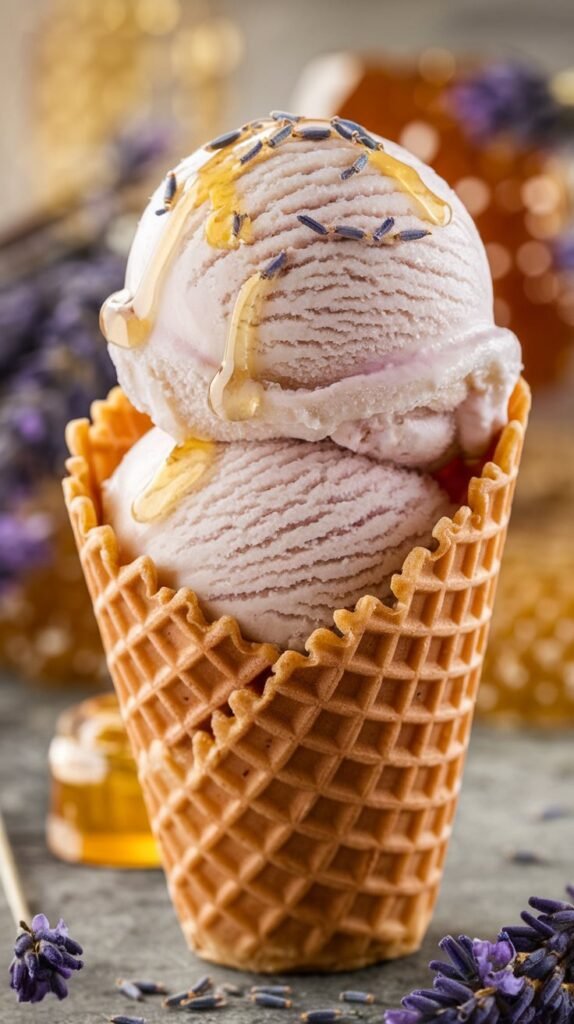
Lavender Honey Ice Cream is a delightful treat that brings a touch of spring to your dessert table. The soothing floral notes of lavender combined with the natural sweetness of honey create a unique flavor profile that is both refreshing and indulgent. Not only is it easy to make, but it also requires just a few simple ingredients, making it a perfect choice for a casual Easter gathering.
This ice cream is creamy, aromatic, and melts beautifully in your mouth. It’s a wonderful way to impress your friends and family without spending hours in the kitchen. Serve it in a cone or a bowl, and watch it become the star of your dessert spread!
Ingredients
- 2 cups heavy cream
- 1 cup whole milk
- 3/4 cup honey
- 1 tablespoon dried culinary lavender
- 1 teaspoon vanilla extract
- Pinch of salt
- Optional: purple food coloring
Instructions
- Make the Lavender Infusion: In a saucepan, combine the heavy cream, whole milk, honey, and dried lavender. Heat over medium heat until it just starts to simmer. Remove from heat and let it steep for about 15-20 minutes.
- Strain the Mixture: After steeping, strain the mixture through a fine mesh sieve to remove the lavender flowers. Stir in the vanilla extract and a pinch of salt. If you’d like a more vibrant color, add a drop of purple food coloring.
- Chill the Mixture: Refrigerate the mixture for at least 2 hours, or until it’s completely cold.
- Churn: Pour the chilled mixture into an ice cream maker and churn according to the manufacturer’s instructions until it reaches a soft-serve consistency.
- Freeze: Transfer the ice cream to a lidded container and freeze for at least 4 hours, or until firm.
- Serve: Scoop the lavender honey ice cream into cones or bowls, and enjoy the unique flavor!
Springtime Lemon Tart

This Springtime Lemon Tart is a delightful blend of tangy and sweet, perfect for celebrating Easter. With a buttery crust and a smooth lemon filling, it brings a refreshing burst of flavor that embodies the essence of spring.
What’s great about this dessert is how simple it is to make. You’ll be able to whip it up in no time, impressing your family and friends with its lovely presentation and vibrant taste!
Ingredients
- 1 ½ cups all-purpose flour
- ½ cup powdered sugar
- ½ cup unsalted butter, chilled and cubed
- 1 large egg yolk
- 2 tablespoons ice water
- 1 cup granulated sugar
- 3 large eggs
- 1 cup fresh lemon juice
- 1 tablespoon lemon zest
- Pinch of salt
Instructions
- Make the Crust: Preheat your oven to 350°F (175°C). In a mixing bowl, combine flour and powdered sugar. Cut in the chilled butter until the mixture resembles coarse crumbs. Stir in the egg yolk and ice water until the dough forms. Press the dough into a tart pan and prick the bottom with a fork.
- Bake the Crust: Bake the crust for 15-20 minutes or until lightly golden. Remove from the oven and let it cool.
- Prepare the Filling: In another bowl, whisk together granulated sugar, eggs, lemon juice, lemon zest, and salt until smooth.
- Fill the Tart: Pour the lemon mixture into the cooled crust and bake for an additional 20-25 minutes, until the filling is set but still slightly jiggly in the center.
- Cool and Serve: Let the tart cool completely before slicing. Enjoy it chilled or at room temperature, and consider garnishing with fresh berries or edible flowers for an extra touch!
Vanilla Easter Cupcakes

Vanilla Easter Cupcakes are a delightful treat that perfectly captures the spirit of the holiday. These soft, fluffy cupcakes offer a light and sweet flavor that pairs beautifully with a variety of colorful frostings. Simple to make, they are a great baking project for both beginners and experienced bakers alike, ensuring that everyone can enjoy a taste of spring.
Decorated with playful designs, these cupcakes can be topped with pastel-colored icing and charming decorations like bunny ears or edible flowers. They not only taste delicious but also add a festive touch to any Easter celebration, making them a favorite for gatherings with family and friends.
Ingredients
- 1 1/2 cups all-purpose flour
- 1 cup granulated sugar
- 1/2 cup unsalted butter, softened
- 2 large eggs
- 1/2 cup milk
- 1 tablespoon vanilla extract
- 1 1/2 teaspoons baking powder
- 1/4 teaspoon salt
- Food coloring (optional)
Instructions
- Preheat the Oven: Start by preheating your oven to 350°F (175°C) and lining a cupcake pan with paper liners.
- Mix the Batter: In a large bowl, cream together the softened butter and sugar until fluffy. Add the eggs one at a time, mixing well after each addition. Stir in the vanilla extract.
- Combine Dry Ingredients: In another bowl, whisk together the flour, baking powder, and salt. Gradually add the dry ingredients to the wet mixture, alternating with the milk, until well incorporated.
- Fill the Cups: Divide the batter evenly among the cupcake liners, filling each about two-thirds full. If desired, add a few drops of food coloring for a fun twist.
- Bake: Bake in the preheated oven for 18-20 minutes, or until a toothpick inserted into the center comes out clean. Allow to cool completely before frosting.
- Decorate: Once cooled, decorate your cupcakes with your favorite frosting and festive toppings to celebrate Easter.
Chocolate Dipped Strawberries

Chocolate dipped strawberries are a delightful combination of fresh, juicy berries and rich, smooth chocolate. They’re perfect for celebrating Easter or any occasion where you want a sweet treat that feels a little fancy. The contrast between the tartness of the strawberries and the sweetness of the chocolate makes every bite enjoyable.
This recipe is simple enough for anyone to whip up, needing just a few ingredients and a little bit of time. Whether you’re making them for a gathering or just to treat yourself, these chocolate dipped strawberries are sure to impress!
Ingredients
- 1 pound fresh strawberries
- 8 ounces semi-sweet chocolate chips
- 1 tablespoon coconut oil (optional, for smoother chocolate)
- Sprinkles or crushed nuts for decoration (optional)
Instructions
- Prepare the Strawberries: Rinse the strawberries under cold water and pat them dry with a paper towel. Make sure they are completely dry for the chocolate to adhere properly.
- Melt the Chocolate: In a microwave-safe bowl, combine the chocolate chips and coconut oil (if using). Microwave in 30-second intervals, stirring in between, until smooth and fully melted.
- Dip the Strawberries: Hold each strawberry by the green leaves and dip it into the melted chocolate, swirling to coat completely. Let the excess chocolate drip off.
- Add Toppings: If desired, sprinkle your favorite toppings over the chocolate-dipped part before it sets.
- Set to Harden: Place the dipped strawberries on a parchment-lined baking sheet. Allow them to cool at room temperature or place them in the refrigerator for about 15-30 minutes until the chocolate hardens.
Bunny-Shaped Sugar Cookies

Bunny-shaped sugar cookies are a delightful treat that brings a touch of whimsy to your Easter celebrations. These cookies are not only sweet and buttery, but they also offer a fun way to get creative with decoration, making them a hit with kids and adults alike. With a simple dough that rolls out easily, these cookies can be cut into adorable bunny shapes and decorated with colorful icing.
This recipe is straightforward, perfect for bakers of any level. Whether you’re looking to make them for a gathering or just to enjoy at home, these cookies are sure to add joy to your Easter festivities.
Ingredients
- 2 3/4 cups all-purpose flour
- 1 teaspoon baking powder
- 1/4 teaspoon salt
- 1 cup unsalted butter, softened
- 1 1/2 cups granulated sugar
- 1 large egg
- 1 teaspoon vanilla extract
- 1/2 teaspoon almond extract (optional)
- Royal icing for decoration
- Food coloring for icing
Instructions
- Prepare the Dough: In a bowl, whisk together the flour, baking powder, and salt. In another large bowl, cream the softened butter and sugar until light and fluffy. Add the egg, vanilla, and almond extract, mixing well. Gradually add the flour mixture, stirring until combined.
- Chill: Divide the dough into two portions, flatten into disks, wrap in plastic wrap, and refrigerate for at least one hour to make it easier to roll out.
- Roll and Cut: Preheat your oven to 350°F (175°C). On a lightly floured surface, roll out one disk of dough to about 1/4-inch thickness. Use a bunny-shaped cookie cutter to cut out shapes and place them on a parchment-lined baking sheet.
- Bake: Bake for 8-10 minutes, or until the edges are lightly golden. Allow the cookies to cool on a wire rack.
- Decorate: Once cooled, use royal icing to decorate the cookies. You can use food coloring to create different designs and colors for your bunnies.
Coconut Macaroons with Chocolate Drizzle
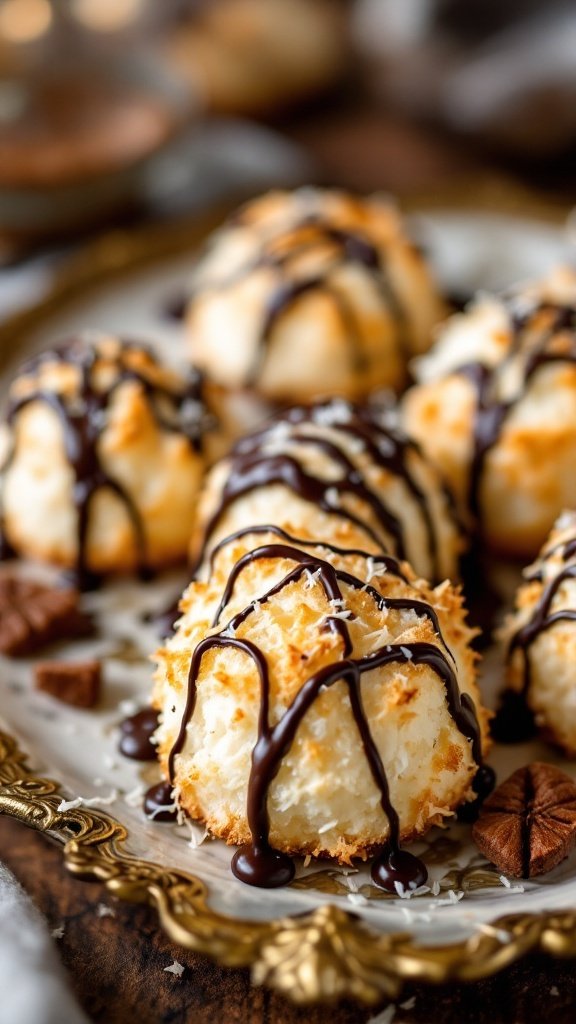
Coconut macaroons are a delightful treat that pairs the chewy texture of coconut with a subtle sweetness, making them perfect for any occasion, especially Easter. The addition of a smooth chocolate drizzle elevates these macaroons, adding a rich flavor that complements the coconut beautifully. Plus, they’re super easy to make, so you can whip them up in no time!
These cookies are not only simple to prepare but also require minimal ingredients. With just shredded coconut, sweetened condensed milk, and a few pantry staples, you can create a batch that your family and friends will love. They’re the ideal sweet treat to bring to gatherings or to enjoy at home.
Ingredients
- 4 cups sweetened shredded coconut
- 1 can (14 ounces) sweetened condensed milk
- 1 teaspoon vanilla extract
- 1/4 teaspoon almond extract (optional)
- 2 large egg whites
- 1/4 teaspoon salt
- 1 cup semi-sweet chocolate chips
Instructions
- Preheat the oven to 325°F (160°C) and line a baking sheet with parchment paper.
- In a large bowl, combine the shredded coconut, sweetened condensed milk, vanilla extract, and almond extract. Mix until well combined.
- In a separate bowl, beat the egg whites and salt until stiff peaks form. Gently fold the egg whites into the coconut mixture until fully incorporated.
- Using a cookie scoop or your hands, form small mounds of the mixture and place them on the prepared baking sheet, leaving space between each.
- Bake for 25-30 minutes, or until the macaroons are lightly golden brown. Remove from the oven and let them cool completely.
- While the macaroons cool, melt the chocolate chips in a microwave-safe bowl in 30-second intervals, stirring until smooth.
- Drizzle the melted chocolate over the cooled macaroons using a spoon or a piping bag. Allow the chocolate to set before serving.
Orange Blossom Scented Cupcakes

Orange Blossom Scented Cupcakes are a delightful treat that captures the essence of spring. These cupcakes are light, fluffy, and infused with a subtle floral aroma that pairs beautifully with the zesty flavor of orange. They’re simple to make, requiring just a few ingredients and minimal time.
The combination of orange zest and orange blossom water creates a refreshing taste, making these cupcakes perfect for any Easter celebration or spring gathering. Topped with a creamy frosting and garnished with edible flowers, they bring a touch of elegance to your dessert table.
Ingredients
- 1 ½ cups all-purpose flour
- 1 cup granulated sugar
- ½ cup unsalted butter, softened
- 2 large eggs
- ½ cup milk
- 1 tablespoon orange zest
- 1 teaspoon orange blossom water
- 1 ½ teaspoons baking powder
- ½ teaspoon salt
- 2 cups frosting (store-bought or homemade)
- Edible flowers for garnish
Instructions
- Preheat the oven to 350°F (175°C) and line a cupcake tin with liners.
- In a mixing bowl, cream the softened butter and sugar until light and fluffy.
- Add the eggs, one at a time, mixing well after each addition.
- Stir in the milk, orange zest, and orange blossom water until combined.
- In a separate bowl, whisk together the flour, baking powder, and salt. Gradually add this mixture to the wet ingredients, mixing until just combined.
- Divide the batter evenly among the cupcake liners, filling each about two-thirds full.
- Bake for 18-20 minutes, or until a toothpick inserted into the center comes out clean. Allow to cool completely.
- Frost with your choice of frosting and decorate with edible flowers before serving.
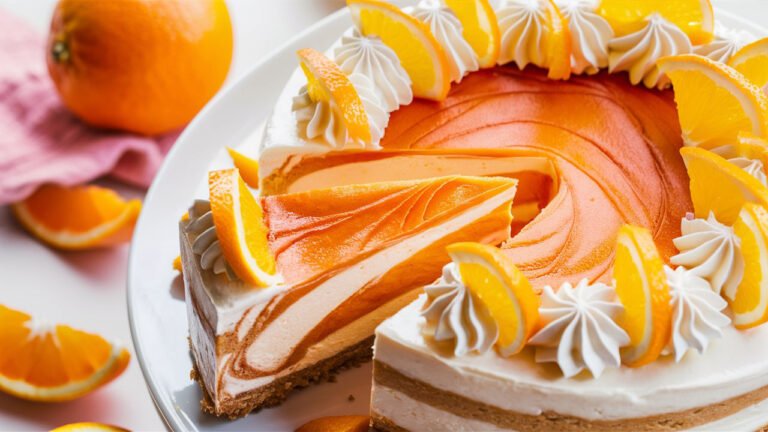
Fruit Tart with Cream Cheese Filling
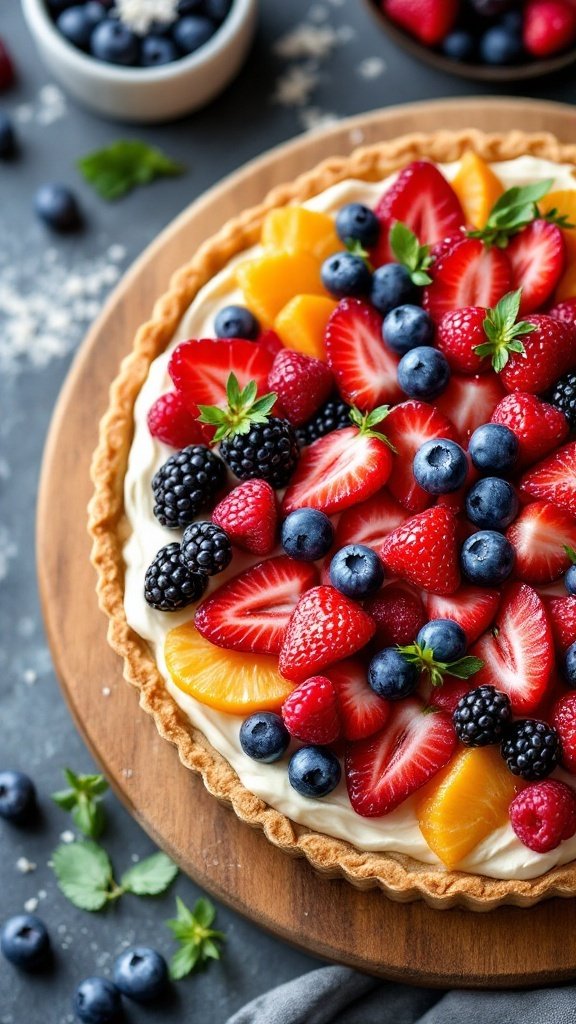
A fruit tart with cream cheese filling is a delightful treat that’s perfect for spring celebrations. The crisp crust is paired with a rich, creamy filling and topped with a vibrant array of fresh fruits, making it both visually appealing and delicious. This dessert balances sweetness with a slight tang, creating a refreshing option for your Easter table.
This recipe is simple to make and great for bakers of all skill levels. It’s an enjoyable project that allows for creativity with the fruit toppings, so feel free to use your favorites!
Ingredients
- 1 pre-made tart shell
- 8 oz cream cheese, softened
- 1/2 cup powdered sugar
- 1 teaspoon vanilla extract
- 2 cups mixed fresh fruits (strawberries, blueberries, blackberries, and oranges work well)
- 1 tablespoon lemon juice
Instructions
- Prepare the Filling: In a mixing bowl, beat the softened cream cheese until smooth. Add the powdered sugar and vanilla extract, and continue to mix until well combined.
- Fill the Tart: Spread the cream cheese mixture evenly into the pre-made tart shell, smoothing the top with a spatula.
- Top with Fruits: Arrange the mixed fresh fruits on top of the cream cheese filling. Drizzle lemon juice over the fruit to enhance flavor and prevent browning.
- Chill and Serve: Refrigerate the tart for at least one hour before serving to allow the flavors to meld and the filling to set. Slice and enjoy!
Frequently Asked Questions About Easter Desserts 🤔
How far in advance can I make Easter desserts?
Most cakes, cookies, and cheesecakes can be made 2-3 days ahead and stored properly. For freshness, add any final decorations or toppings the day of serving. Some desserts like tiramisu and trifles actually taste better after the flavors have had time to meld!
What are some traditional Easter dessert ingredients?
Traditional Easter baking often includes:
- Carrots (symbolizing spring and fertility)
- Eggs (representing new life)
- Lamb-shaped cakes (religious symbolism)
- Hot cross buns (marked with a cross)
- Citrus flavors (freshness of spring)
How can I make my Easter desserts more festive?
Easy ways to add Easter flair:
- Use pastel colors in frostings and decorations
- Shape desserts like eggs, bunnies, or chicks
- Add edible flowers for a spring touch
- Include Easter candies as decorations
- Use Easter-themed cookie cutters for cookies and cake toppers
What are some easy Easter desserts for kids to help make?
Kids love helping with:
- Rice Krispie nests
- Decorated sugar cookies
- Chocolate-dipped strawberries
- No-bake cheesecake cups
- Cupcake decorating
What gluten-free options work well for Easter?
Besides the flourless torte and macarons mentioned above, consider:
- Pavlovas and meringues
- Crème brûlée
- Chocolate mousse
- Rice pudding
- Ice cream desserts with gluten-free mix-ins
The Sweet Finish 🍰
Whether you’re a baking pro or just starting out, there’s an Easter dessert recipe here for every skill level and taste preference. The best part about holiday baking isn’t just the delicious results – it’s the traditions we create and the memories we make in the process.
My family still talks about the year I accidentally used salt instead of sugar in the Easter cookies (don’t bake while sleepy, folks!). Even kitchen disasters become cherished stories over time.
So preheat that oven, gather your ingredients, maybe recruit some helpers, and get ready to create some seriously delicious Easter treats that might just become your new family traditions. Happy baking and happy Easter!


These are delightful recipes, I’m excited to try them.
Hello,
I have a quick question. How do I get the bunny cake’s – bunny body upwards, like you are showing. If i decorate a round cake, how will i make a chunky body, like you show in your picture. Your help would be greatly appreciated.
Thank you
Hi there! 😊
Great question — I’m so glad you’re giving the bunny cake a try!
To get that cute, upright bunny shape like in the photo, here’s what I recommend:
Use two cake pans – one for the base (the body) and one to carve the head and shape.
For the body, bake one cake in a rounded bowl (like an oven-safe Pyrex bowl) or stack two 6-inch round cakes with frosting between them to build height and create that “chunky” look. You can also slightly carve the sides to get more of a rounded bunny shape if you’d like.
For the head, take a second round cake, cut it in half, and stack the halves with frosting to form a dome. Place this on top of the body.
Use cake scraps or marshmallow pieces to shape the arms and ears.
Once everything’s stacked and shaped, cover the whole thing in frosting and coconut to create that fluffy texture!
Don’t worry if it’s not perfect — once you decorate the face and add the candy accents, it all comes together so sweetly. 💛
Let me know how it turns out, and feel free to share a photo — I’d love to see your version!